# 

<link rel="stylesheet" href="/static/custom.css">

<div class="header">
  <div class="inner">
    <img src="../../images/quickstart/cms-pro-logo.jpg" alt="CMS Pro Logo">
    <div>
      <h1>CMS Pro</h1>
      <p style="margin-bottom: .5rem;">A business-grade content management system built from the ground up for <br>Amazon Web Services (AWS).</p>
      <p class="mb-0"><a href="../../images/quickstart/pro/solodev-cms-pro-architecture-2024-2.jpg" rel="noopener noreferrer" target="_blank">Diagram <svg xmlns="http://www.w3.org/2000/svg" class="docs-icon" viewBox="0 0 24 24" role="presentation" width="16" height="16" style="display: inline; vertical-align: middle;"><g fill="currentColor"><path d="M15.5 2.25a.75.75 0 0 1 .75-.75h5.5a.75.75 0 0 1 .75.75v5.5a.75.75 0 0 1-1.5 0V4.06l-6.22 6.22a.75.75 0 1 1-1.06-1.06L19.94 3h-3.69a.75.75 0 0 1-.75-.75Z"></path><path d="M2.5 4.25c0-.966.784-1.75 1.75-1.75h8.5a.75.75 0 0 1 0 1.5h-8.5a.25.25 0 0 0-.25.25v15.5c0 .138.112.25.25.25h15.5a.25.25 0 0 0 .25-.25v-8.5a.75.75 0 0 1 1.5 0v8.5a1.75 1.75 0 0 1-1.75 1.75H4.25a1.75 1.75 0 0 1-1.75-1.75V4.25Z"></path></g></svg></a></p>
    </div>
  </div>
  <a class="btn-orange-lg" href="https://aws.amazon.com/marketplace/pp/prodview-2km2dv5ozjtga" rel="noopener noreferrer" target="_blank">SUBSCRIBE <span><svg xmlns="http://www.w3.org/2000/svg" viewBox="0 0 16 16" width="20" height="20" fill="#fff"><path d="M3.75 2h3.5a.75.75 0 0 1 0 1.5h-3.5a.25.25 0 0 0-.25.25v8.5c0 .138.112.25.25.25h8.5a.25.25 0 0 0 .25-.25v-3.5a.75.75 0 0 1 1.5 0v3.5A1.75 1.75 0 0 1 12.25 14h-8.5A1.75 1.75 0 0 1 2 12.25v-8.5C2 2.784 2.784 2 3.75 2Zm6.854-1h4.146a.25.25 0 0 1 .25.25v4.146a.25.25 0 0 1-.427.177L13.03 4.03 9.28 7.78a.751.751 0 0 1-1.042-.018.751.751 0 0 1-.018-1.042l3.75-3.75-1.543-1.543A.25.25 0 0 1 10.604 1Z"></path></svg></span></a>
</div>

<p style="margin: .75rem 0 1.5rem;">Already subscribed? <a class="btn-blue-lg" href="https://console.aws.amazon.com/cloudformation/home?region=us-east-1#/stacks/create?stackName=solodev-cms-pro&templateURL=https://s3.amazonaws.com/solodev-cms/cloudformation/solodev-cms-pro.yaml" target="_blank" rel="noopener noreferrer" style="padding: .35rem 1.75rem; font-size: .85rem;">LAUNCH <span><svg xmlns="http://www.w3.org/2000/svg" viewBox="0 0 16 16" width="16" height="16" fill="#fff"><path d="M9.5 2c-1.955 0-3.9.685-5.256 1.918a.75.75 0 0 0-.244.55v2.084L2.276 8.276A2.75 2.75 0 0 0 1.5 10.19V13.5a.75.75 0 0 0 .75.75h3.31c.73 0 1.43-.29 1.945-.805l1.724-1.724h2.084a.75.75 0 0 0 .55-.244C13.315 10.4 14 8.455 14 6.5 14 3.5 12.5 2 9.5 2Zm-2.9 9.69-1.724 1.725a.75.75 0 0 1-.53.22H3v-1.446a1.25 1.25 0 0 1 .354-.874L4.31 10.354ZM10 8a1.5 1.5 0 1 1 0-3 1.5 1.5 0 0 1 0 3Z"></path></svg></span></a></p>

## Overview

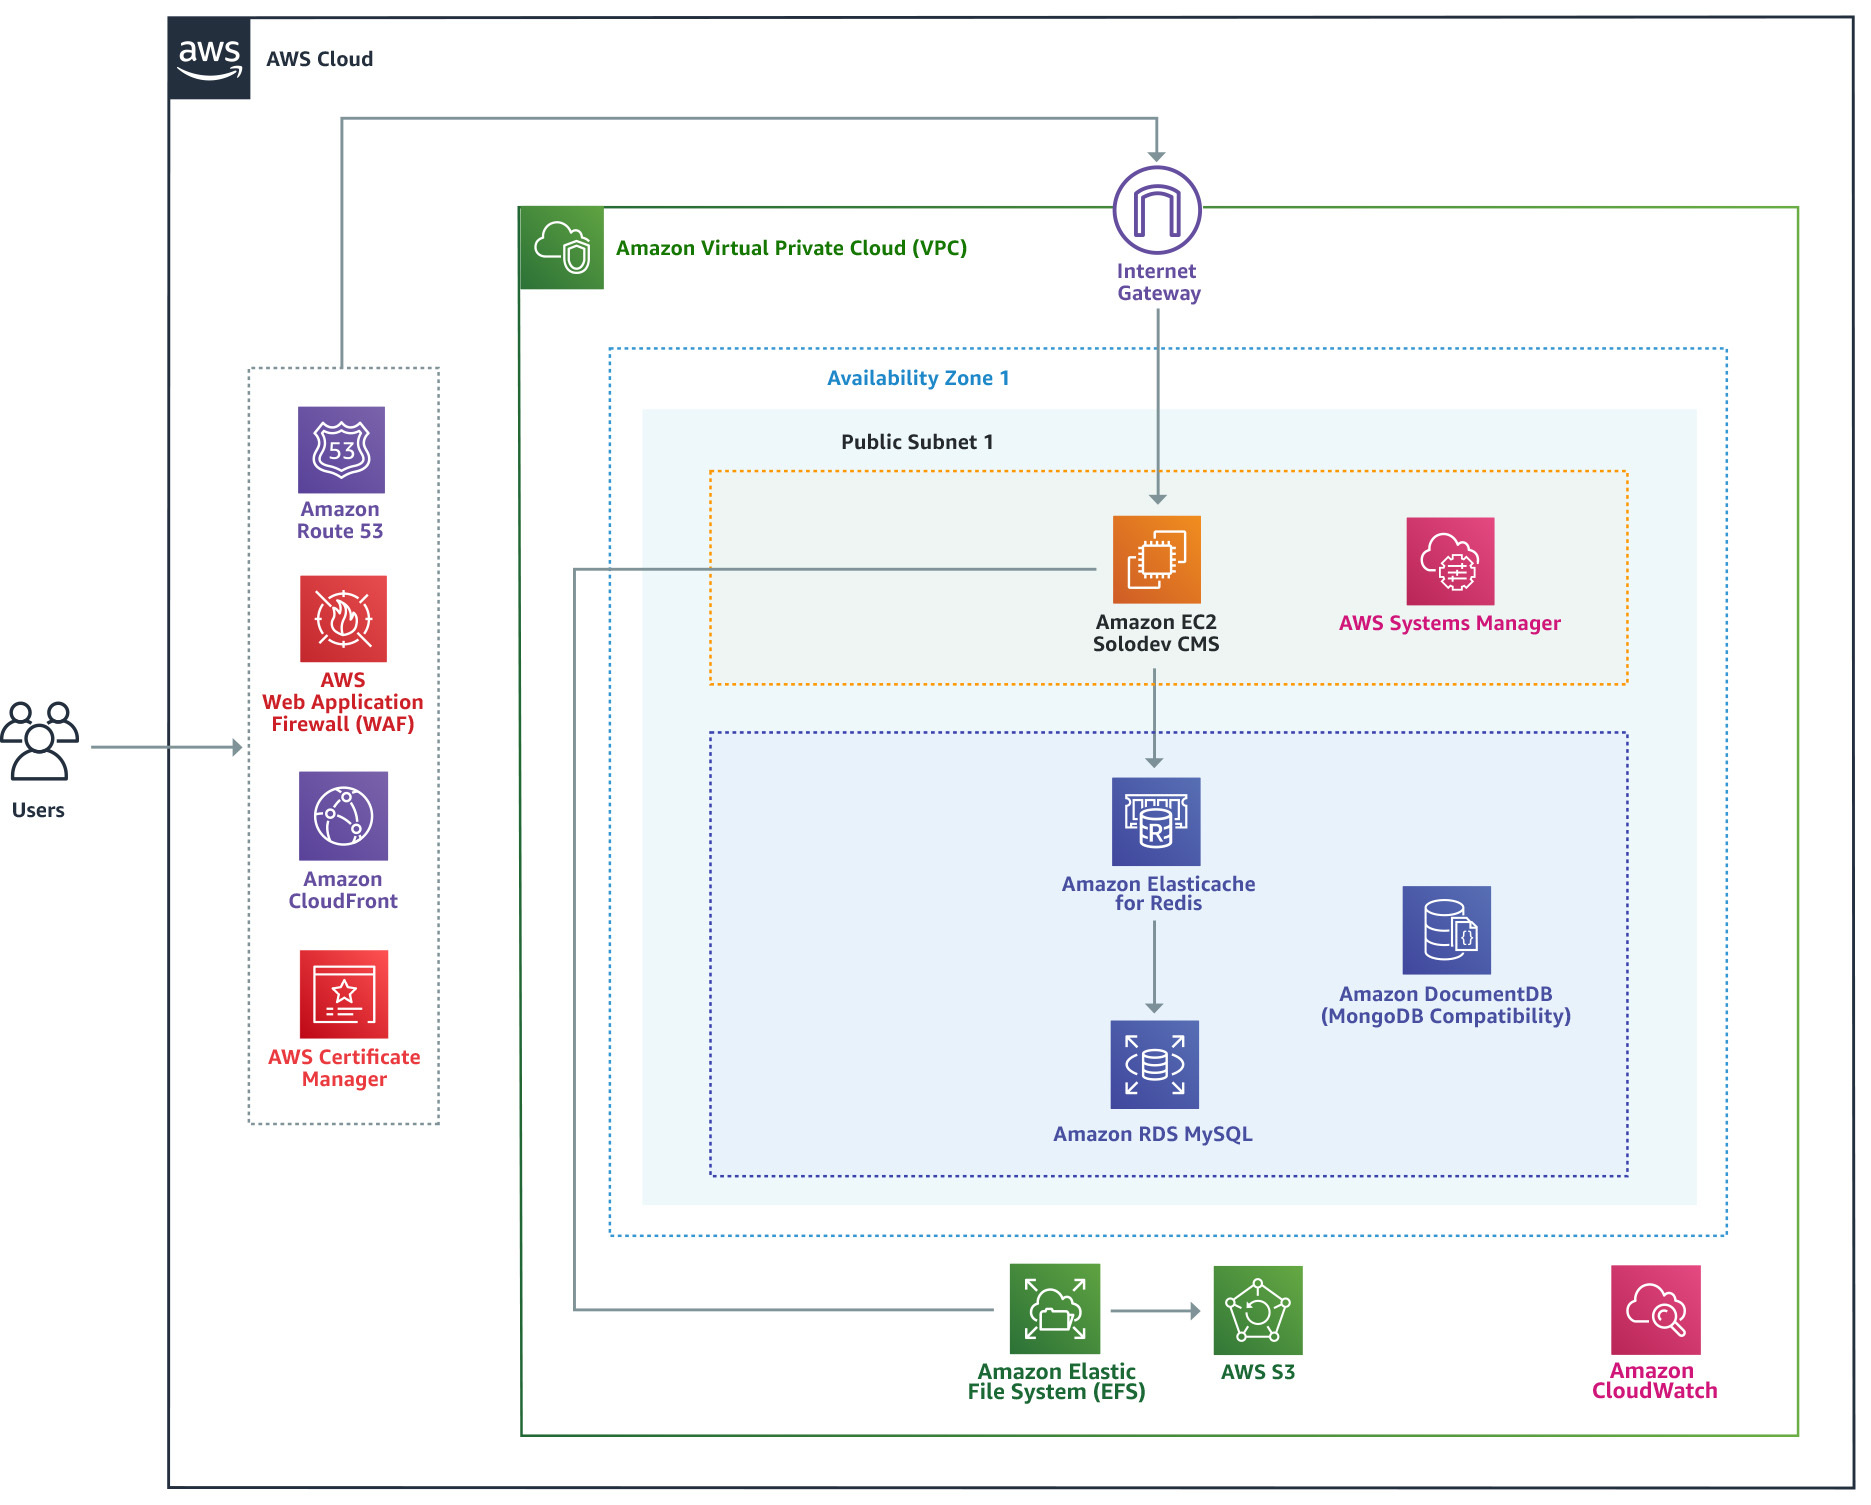
CMS Pro deploys on a single AWS instance and features its own MySQL database. This lightweight architecture allows your websites and apps to meet variable traffic demands while maintaining uptime at a reasonable cost. 

CMS Pro is available in the AWS Marketplace and can be instantly deployed in your account using <a href="https://docs.aws.amazon.com/AWSCloudFormation/latest/UserGuide/Welcome.html" target="_blank" rel="noopener noreferrer">AWS CloudFormation</a>. It leverages an advanced stack of AWS cloud services to deliver a scalable and reliable workload, including:

* <a href="https://docs.aws.amazon.com/acm/latest/userguide/acm-overview.html" target="_blank" rel="noopener noreferrer">Amazon Certificate Manager (ACM)</a>
* <a href="https://docs.aws.amazon.com/AmazonCloudFront/latest/DeveloperGuide/Introduction.html" target="_blank" rel="noopener noreferrer">Amazon CloudFront</a>
* <a href="https://docs.aws.amazon.com/AmazonCloudWatch/latest/monitoring/WhatIsCloudWatch.html" target="_blank" rel="noopener noreferrer">Amazon CloudWatch</a>
* <a href="https://docs.aws.amazon.com/documentdb/latest/developerguide/what-is.html" target="_blank" rel="noopener noreferrer">Amazon DocumentDB (with MongoDB Compatibility)</a>
* <a href="https://docs.aws.amazon.com/AWSEC2/latest/UserGuide/concepts.html" target="_blank" rel="noopener noreferrer">Amazon Elastic Compute Cloud (EC2)</a>
* <a href="https://docs.aws.amazon.com/efs/latest/ug/whatisefs.html" target="_blank" rel="noopener noreferrer">Amazon Elastic File System (EFS)</a>
* <a href="https://aws.amazon.com/elasticache/redis/" target="_blank" rel="noopener noreferrer">Amazon Elasticache for Redis</a>
* <a href="https://aws.amazon.com/systems-manager/" target="_blank">AWS Systems Manager</a>
* <a href="https://docs.aws.amazon.com/AmazonRDS/latest/UserGuide/Welcome.html" target="_blank" rel="noopener noreferrer">Amazon Relational Database Service (RDS) MySql</a>
* <a href="https://docs.aws.amazon.com/Route53/latest/DeveloperGuide/Welcome.html" target="_blank" rel="noopener noreferrer">Amazon Route 53</a>
* <a href="https://docs.aws.amazon.com/AmazonS3/latest/userguide/Welcome.html" target="_blank" rel="noopener noreferrer">Amazon Simple Storage Service (S3)</a>
* <a href="https://docs.aws.amazon.com/vpc/latest/userguide/what-is-amazon-vpc.html" target="_blank" rel="noopener noreferrer">Amazon Virtual Private Cloud (VPC)</a>
* <a href="https://docs.aws.amazon.com/waf/latest/developerguide/what-is-aws-waf.html" target="_blank" rel="noopener noreferrer">Amazon Web Application Firewall (WAF)</a>

Additional technology frameworks and libraries include <a href="https://www.linux.org/" target="_blank" rel="noopener noreferrer">Linux</a>, <a href="https://www.apache.org/" target="_blank" rel="noopener noreferrer">Apache</a>, <a href="https://www.mysql.com/" target="_blank" rel="noopener noreferrer">MySQL</a>, <a href="https://www.php.net/" target="_blank" rel="noopener noreferrer">PHP</a>, <a href="https://www.python.org/" target="_blank" rel="noopener noreferrer">Python</a>, and more.

<p><img src="../../images/quickstart/pro/solodev-cms-pro-architecture-2024-2.jpg" alt="Solodev CMS Pro Architecture" style="width: 75%;"></p>

## Prerequisites

Before launching CMS Professional, you will need to subscribe to Solodev on the AWS Marketplace. Click the button below to get started. Once completed, return to this article and follow the instructions below:

<div class="border p-4" style="height: 137px; margin-bottom: 20px; align-items: center; display: flex;">
  <div style="width: 50%; float: left; text-align: center;">
    <img src="../../images/quickstart/aws-marketplace-logo.jpg" alt="AWS Marketplace Logo" style="width: 70%;">
  </div>
  <div style="width: 50%; float: left; text-align: center;">
    <a href="https://aws.amazon.com/marketplace/pp/B07KMFPW3X/ref=_ptnr_solodev_github_B07KMFPW3X" rel="noopener noreferrer" target="_blank"><img src="../../images/quickstart/subscribe-large.jpg" style="width: 50%;"></a>
  </div>
</div>

## AWS Setup

The following steps cover the setup of the **CMS Pro** on the AWS Marketplace. Click the **“Continue to Subscribe”** button at the top of the AWS Marketplace listing page to continue the process.

### Subscribe to this Software

By subscribing, you gain access to a comprehensive suite of tools and features designed to enhance your productivity and streamline your workflow.

<p><img src="../../images/quickstart/pro/aws-pro-subscribe.jpg" alt="CMS Pro Configure Software Contract" style="width: 80%;"></p>

1. Review and accept the **"Terms and Conditions"**.
2. Click **"Continue to Configuration"**.

!!!NOTE:
Once accepted, you will receive a thank you message asking you to configure your software. <br>This process can take a few moments. Please do not exit the screen or refresh the page.
!!!

### Configure this Software

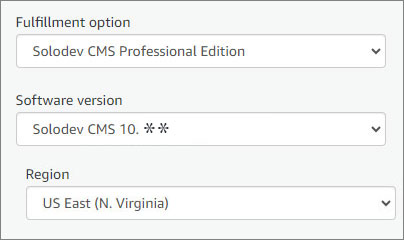
Specify the basic configuration such as the software version and the region you wish to launch the stack.

<p><img src="../../images/quickstart/pro/cms-pro-configure.jpg" alt="CMS Pro Configure"></p>

1. Select a fulfillment option. Fulfillment options relate to how software products are delivered and deployed. This software is packaged as a virtual appliance and deployed on Amazon EC2 instances.
2. Select a software version. The latest version of Solodev CMS Micro is always recommended.
3. When selecting an available AWS Region for hosting, you may want to consider a region that is closer to your users to help reduce your network latency.
4. Click **"Continue to Launch."**

### Launch this software

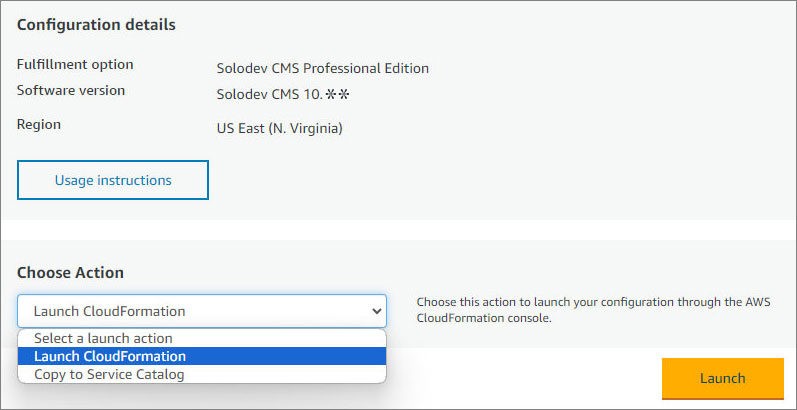
Review the launch configuration details and follow the instructions to launch this software.

<p><img src="../../images/quickstart/pro/cms-pro-launch.jpg" alt="CMS Pro Launch CloudFormation" style="width: 70%; margin-bottom: 20px;"></p>

1. **Choose an Action**
2. Click **"Launch"**.

#### Choose an Action

There are two options for configuring your Solodev CMS Professional: Launch CloudFormation or Copy to Service Catalog. Select one from the menu.

## CloudFormation Stack Wizard

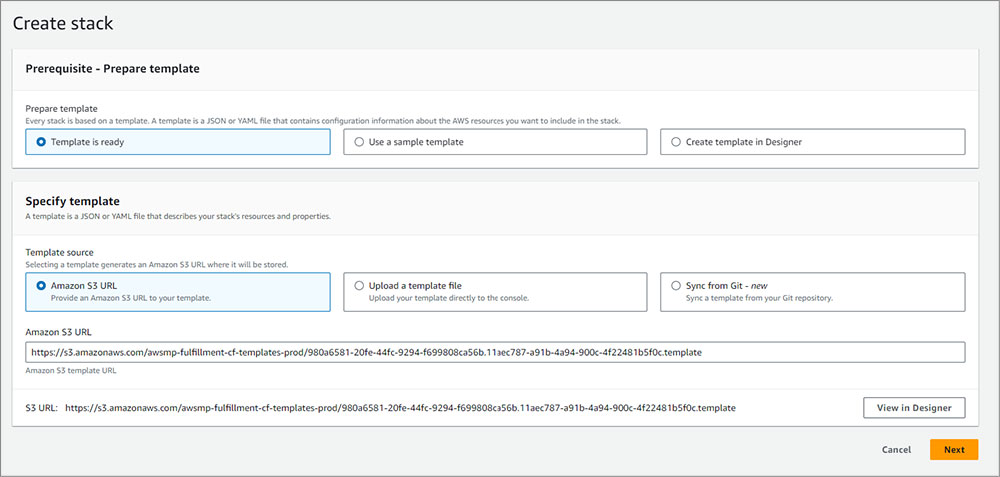
**Step 1:** Create stack

Continue with the pre-selected CloudFormation Template. The Amazon S3 template URL (used for the CloudFormation configuration) should be pre-selected. Click **"Next"** to continue.

<p><img src="../../images/quickstart/create-stack.jpg" alt="CMS Pro Create Stack" style="width: 80%; margin-bottom: 20px;"></p>

**Step 2:** Specify stack details

The following parameters must be configured to launch your Solodev DCX CloudFormation stack:

**Parameter Description** | **Description** 
:--- | ---
Stack name | The name of your stack (set to "solodev-pro" by default). Please note, the name can include letters (A-Z and a-z), numbers (0-9), and dashes (-).

<p><img src="../../images/quickstart/stack-name.png" alt="CMS Pro Stack Name" style="width: 80%;"></p>

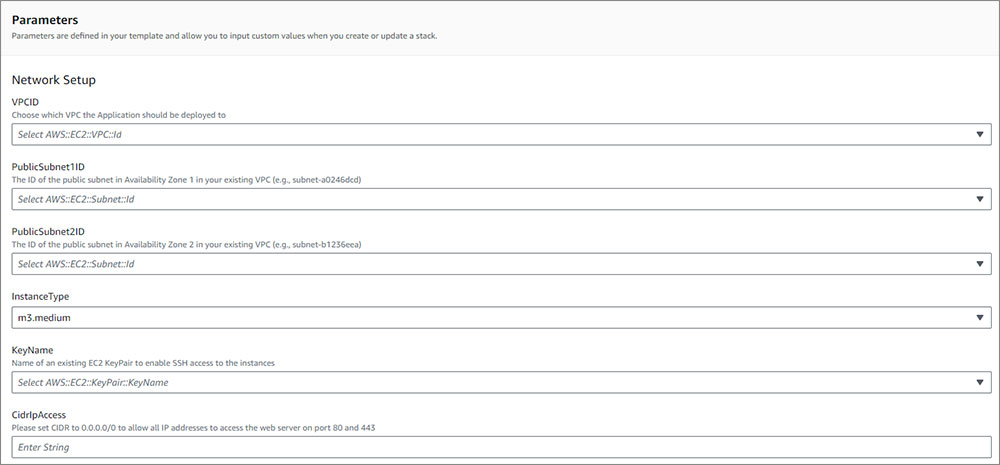
**Network Setup**

**Name** | **Description** 
:--- | ---
VPCID | Choose which VPC the application should be deployed to.
PublicSubnet1ID | The ID of the public subnet in Availability Zone 1 in your existing VPC (e.g., subnet-a0246dcd).
PublicSubnet2ID | The ID of the public subnet in Availability Zone 2 in your existing VPC (e.g., subnet-b1236eea).
InstanceType | The EC2 instance type you wish to launch.
KeyName | Name of an existing EC2 KeyPair to enable SSH access to the instances.
CidrIpAccess | Please set CIDR to 0.0.0.0/0 to allow all IP addresses to access the web server on port 80 and 443

<p><img src="../../images/quickstart/pro/network-setup-pro.jpg" alt="CMS Pro Network Setup"></p>

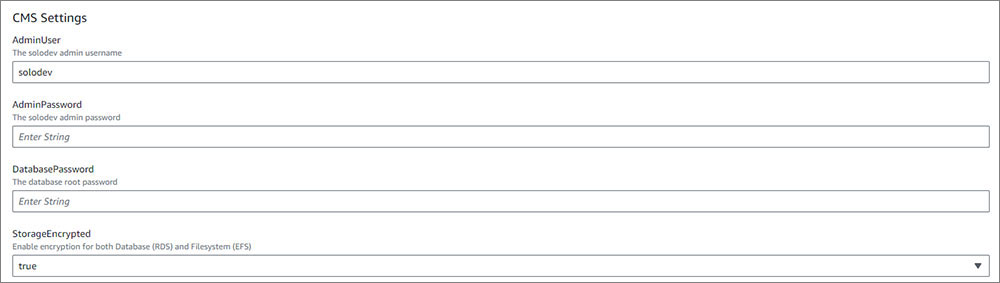
**CMS Settings**

**Name** | **Description** 
:--- | ---
AdminUser | Name of the admin user.
AdminPassword | ***Password must be between 1-41 characters. All characters are allowed***.
DatabasePassword | ***Password must be between 8-41 characters. Only alphanumeric characters are allowed***.
StorageEncrypted | Enable encryption both Database (RDS) and Filesystem (EFS). True or False.

<p><img src="../../images/quickstart/pro/cms-settings-pro.jpg" alt="CMS Pro Settings"></p>

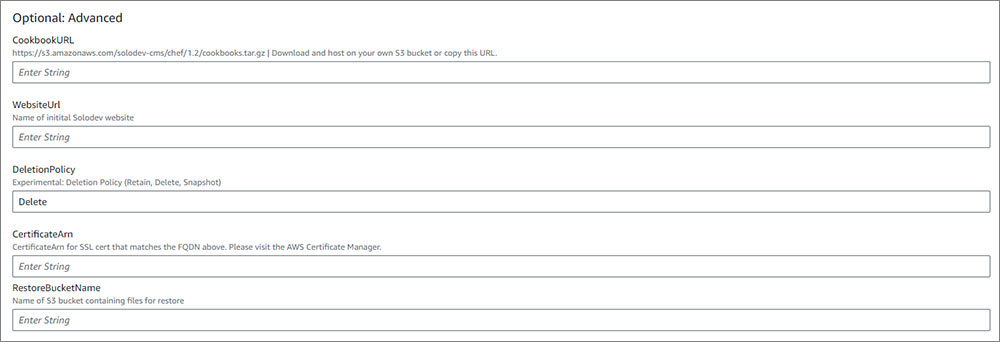
**Optional: Advanced**

**Name** | **Description**
:--- | ---
CookbookURL | https://s3.amazonaws.com/solodev-cms/chef/1.2/cookbooks.tar.gz | Download and host on your own S3 bucket or copy this URL.
WebsiteUrl | Name of your first Solodev website.
DeletionPolicy | Experimental: Deletion Policy (Retain, Delete, Snapshot).
CertificateArn | CertificateArn for SSL cert that matches the FQDN above. Please visit the AWS Certificate Manager.
RestoreBucketName | Name of the S3 bucket containing files for restore.

<p><img src="../../images/quickstart/pro/pro-advanced.jpg" alt="CMS Pro Optional Settings"></p>

!!! Note:
Advanced options are not required in order to start Solodev CMS.
!!!

**Step 3:** Configure stack options

Generally speaking, no additional options need to be configured. If you are experiencing continued problems installing the software, disable "Rollback on failure" under the "Advanced" options. This will allow for further troubleshooting if necessary. Click on the "Next" button to continue.

**Step 4:** Review stack

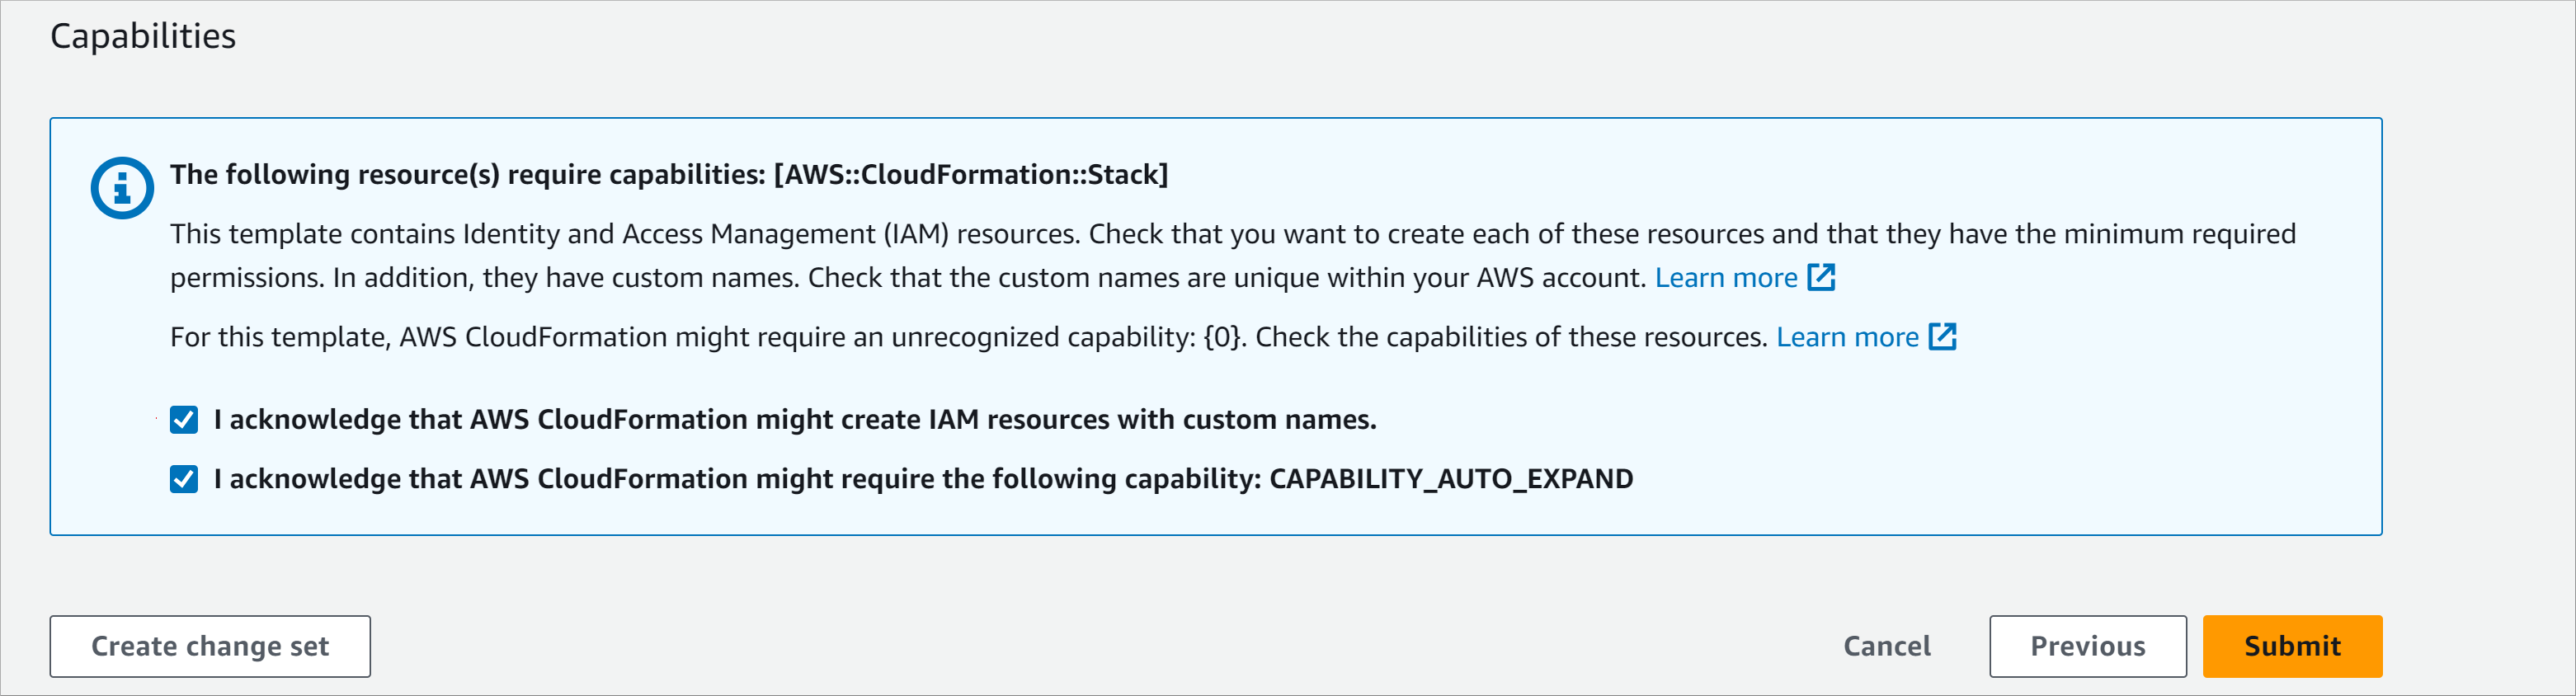
Review all CloudFront details and options. Ensure that the "I acknowledge that AWS CloudFormation might create IAM resources with custom names" checkbox is selected as well as the "I acknowledge that AWS CloudFormation might require the following capability: CAPABILITY_AUTO_EXPAND" checkbox. Click on the **"Submit"** button to launch your stack.

<p><img src="../../images/quickstart/acknowledge.png" alt="CMS Pro Acknowledge Terms" style="width: 80%;"></p>

## Monitor the CloudFormation Stack Creation Process

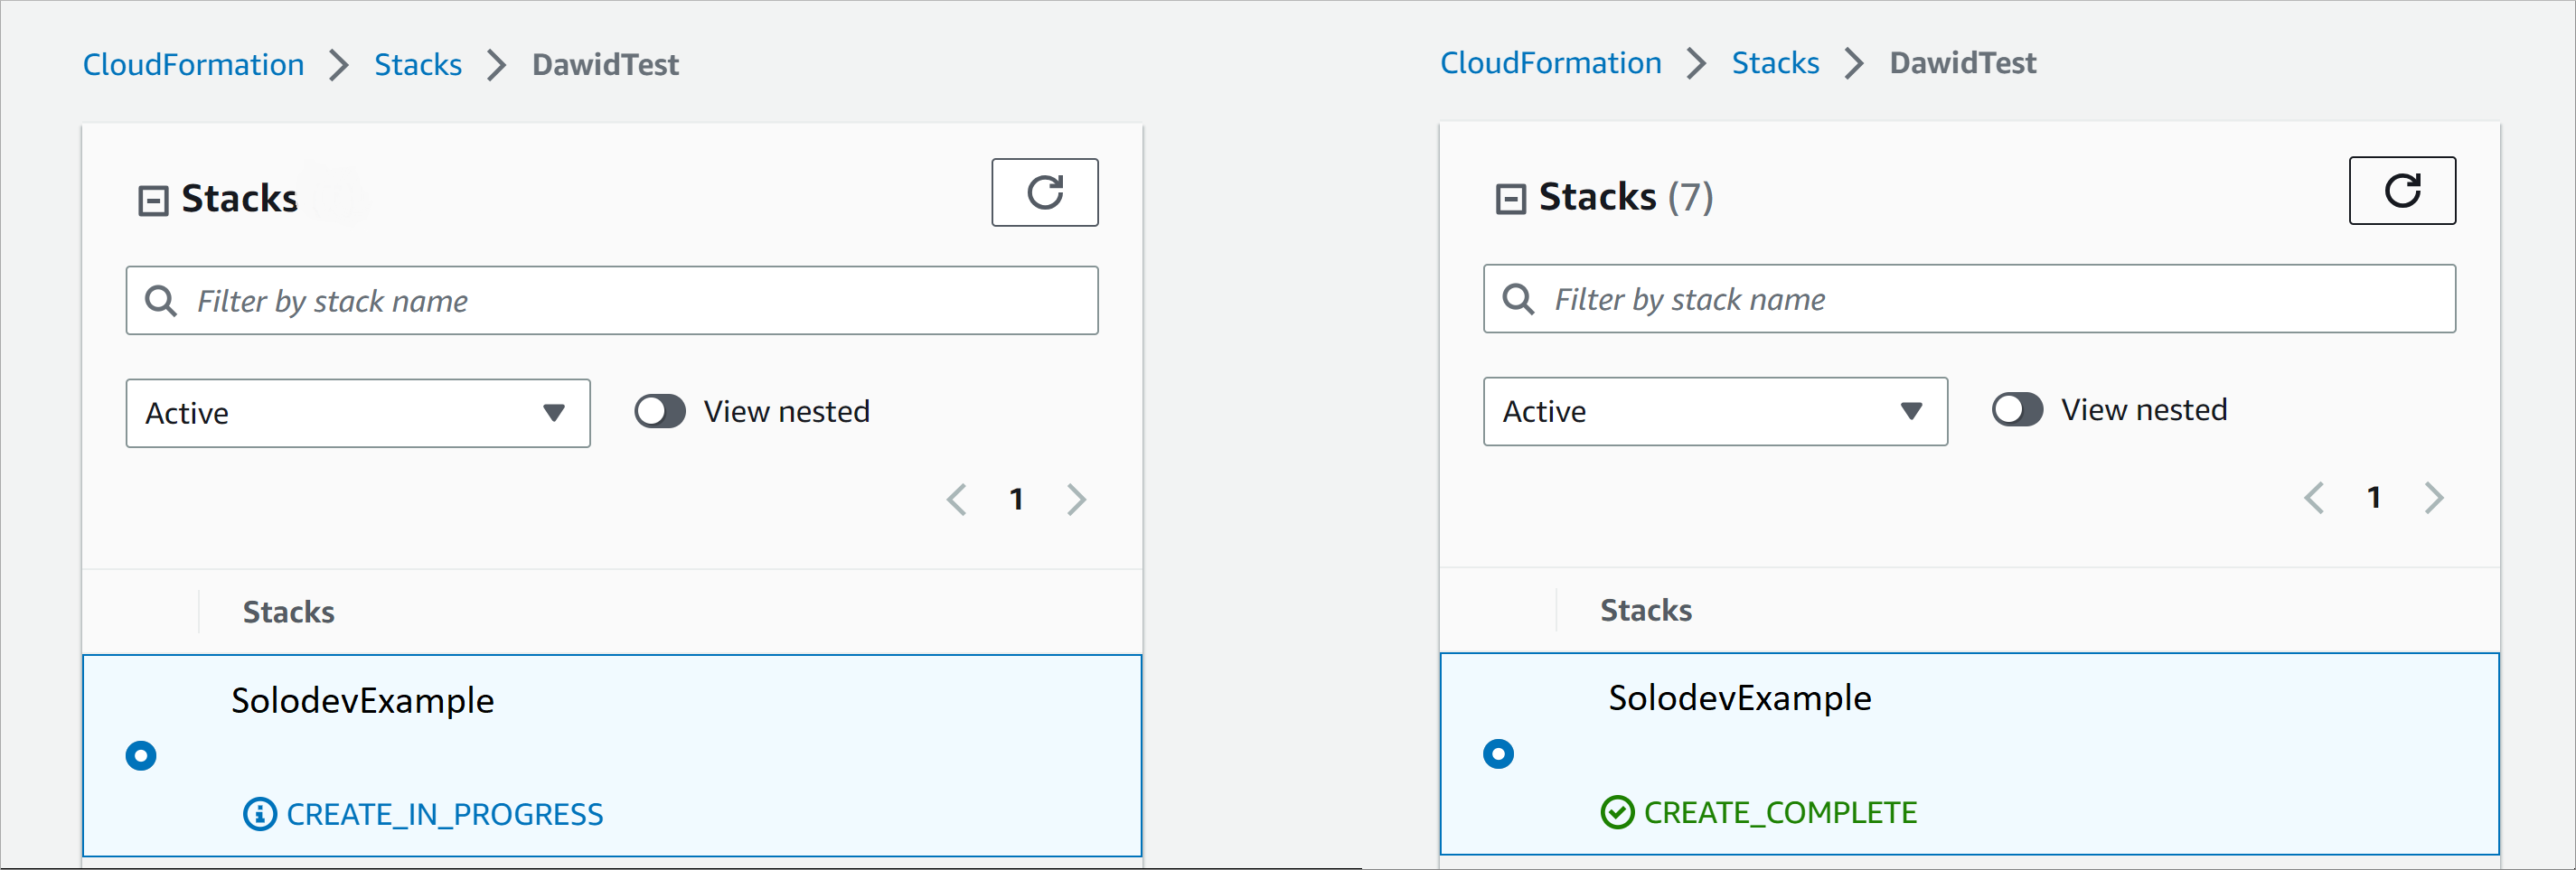
Upon launching your CloudFormation stack, you can monitor the installation logs under the "Events" tab. The CloudFormation template will launch several stacks related to your Solodev instance, including EFS, EDS, and EC2. If you encounter any failures during this time, please visit the Common Issues page to begin troubleshooting.

<p><img src="../../images/quickstart/stack-creation.png" alt="CMS Pro Stack Creation Process" style="width: 80%;"></p>

!!! Note: 
Creating a stack may take up to 30 min depending on the InstanceType you have chosen. During this time AWS session may expire, however the stack will continue to build. In such case simply re-login to your AWS account.
!!!

## View CloudFormation Stack Outputs
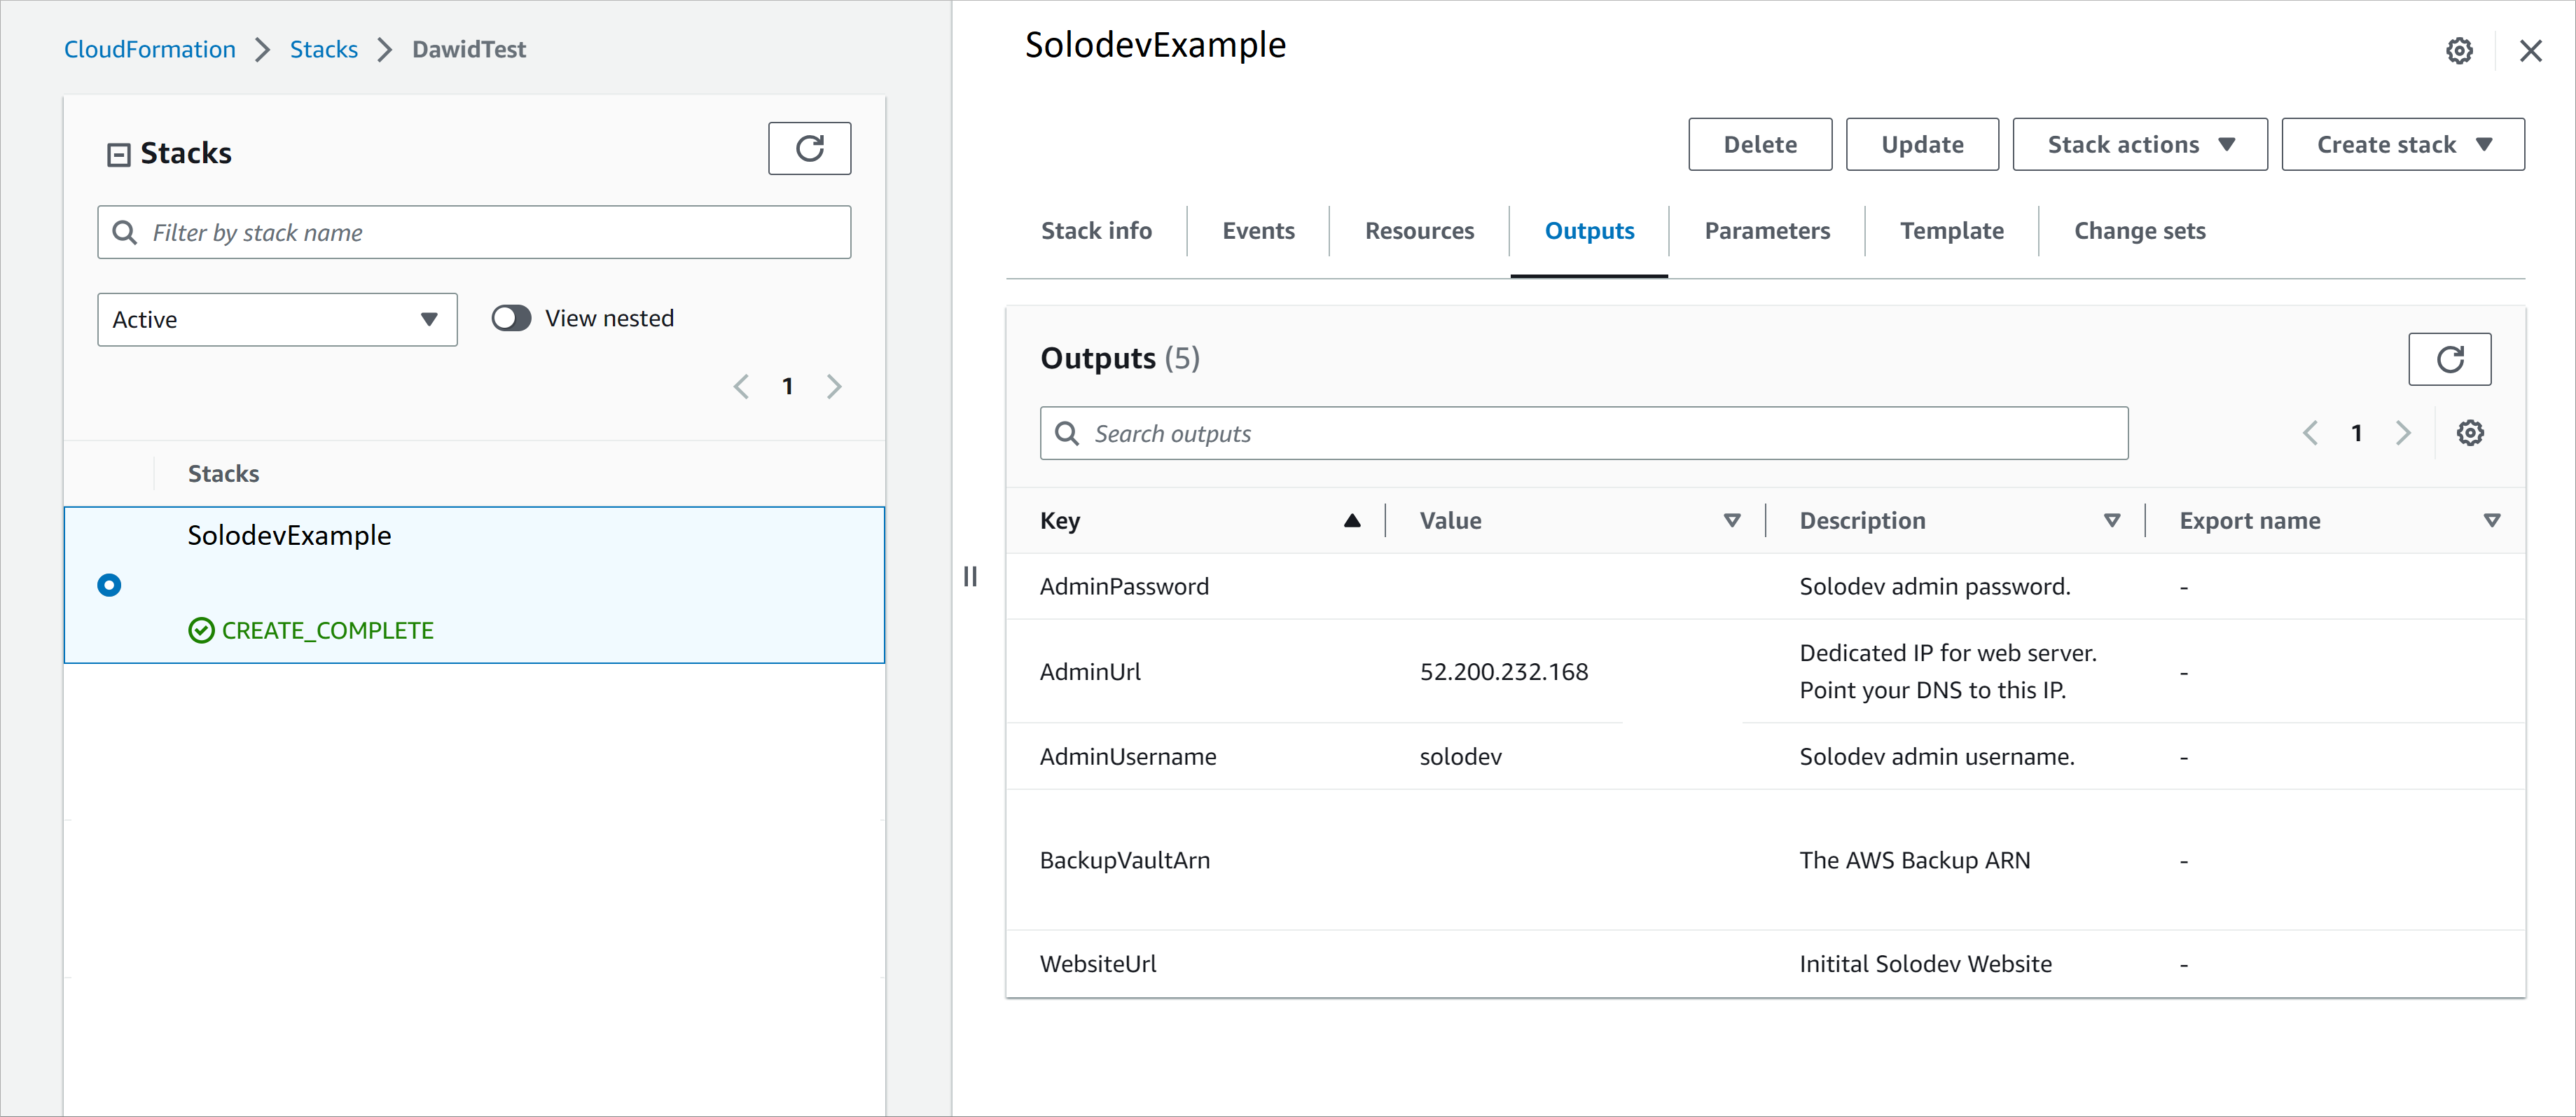
If your stack builds successfully, you will see the green "CREATE_COMPLETE" message. Click on the primary stack and view the "Outputs" tab. You will find the IP address associated with the Solodev backend. Point your primary domain (mydomain.com) and a dedicated backend domain/subdomain (solodev.mydomain.com) to this URL.

<p><img src="../../images/quickstart/stack-complete.png" alt="CMS Pro Stack Create Complete" style="width: 80%;"></p>

## Next Steps

### Login to Solodev

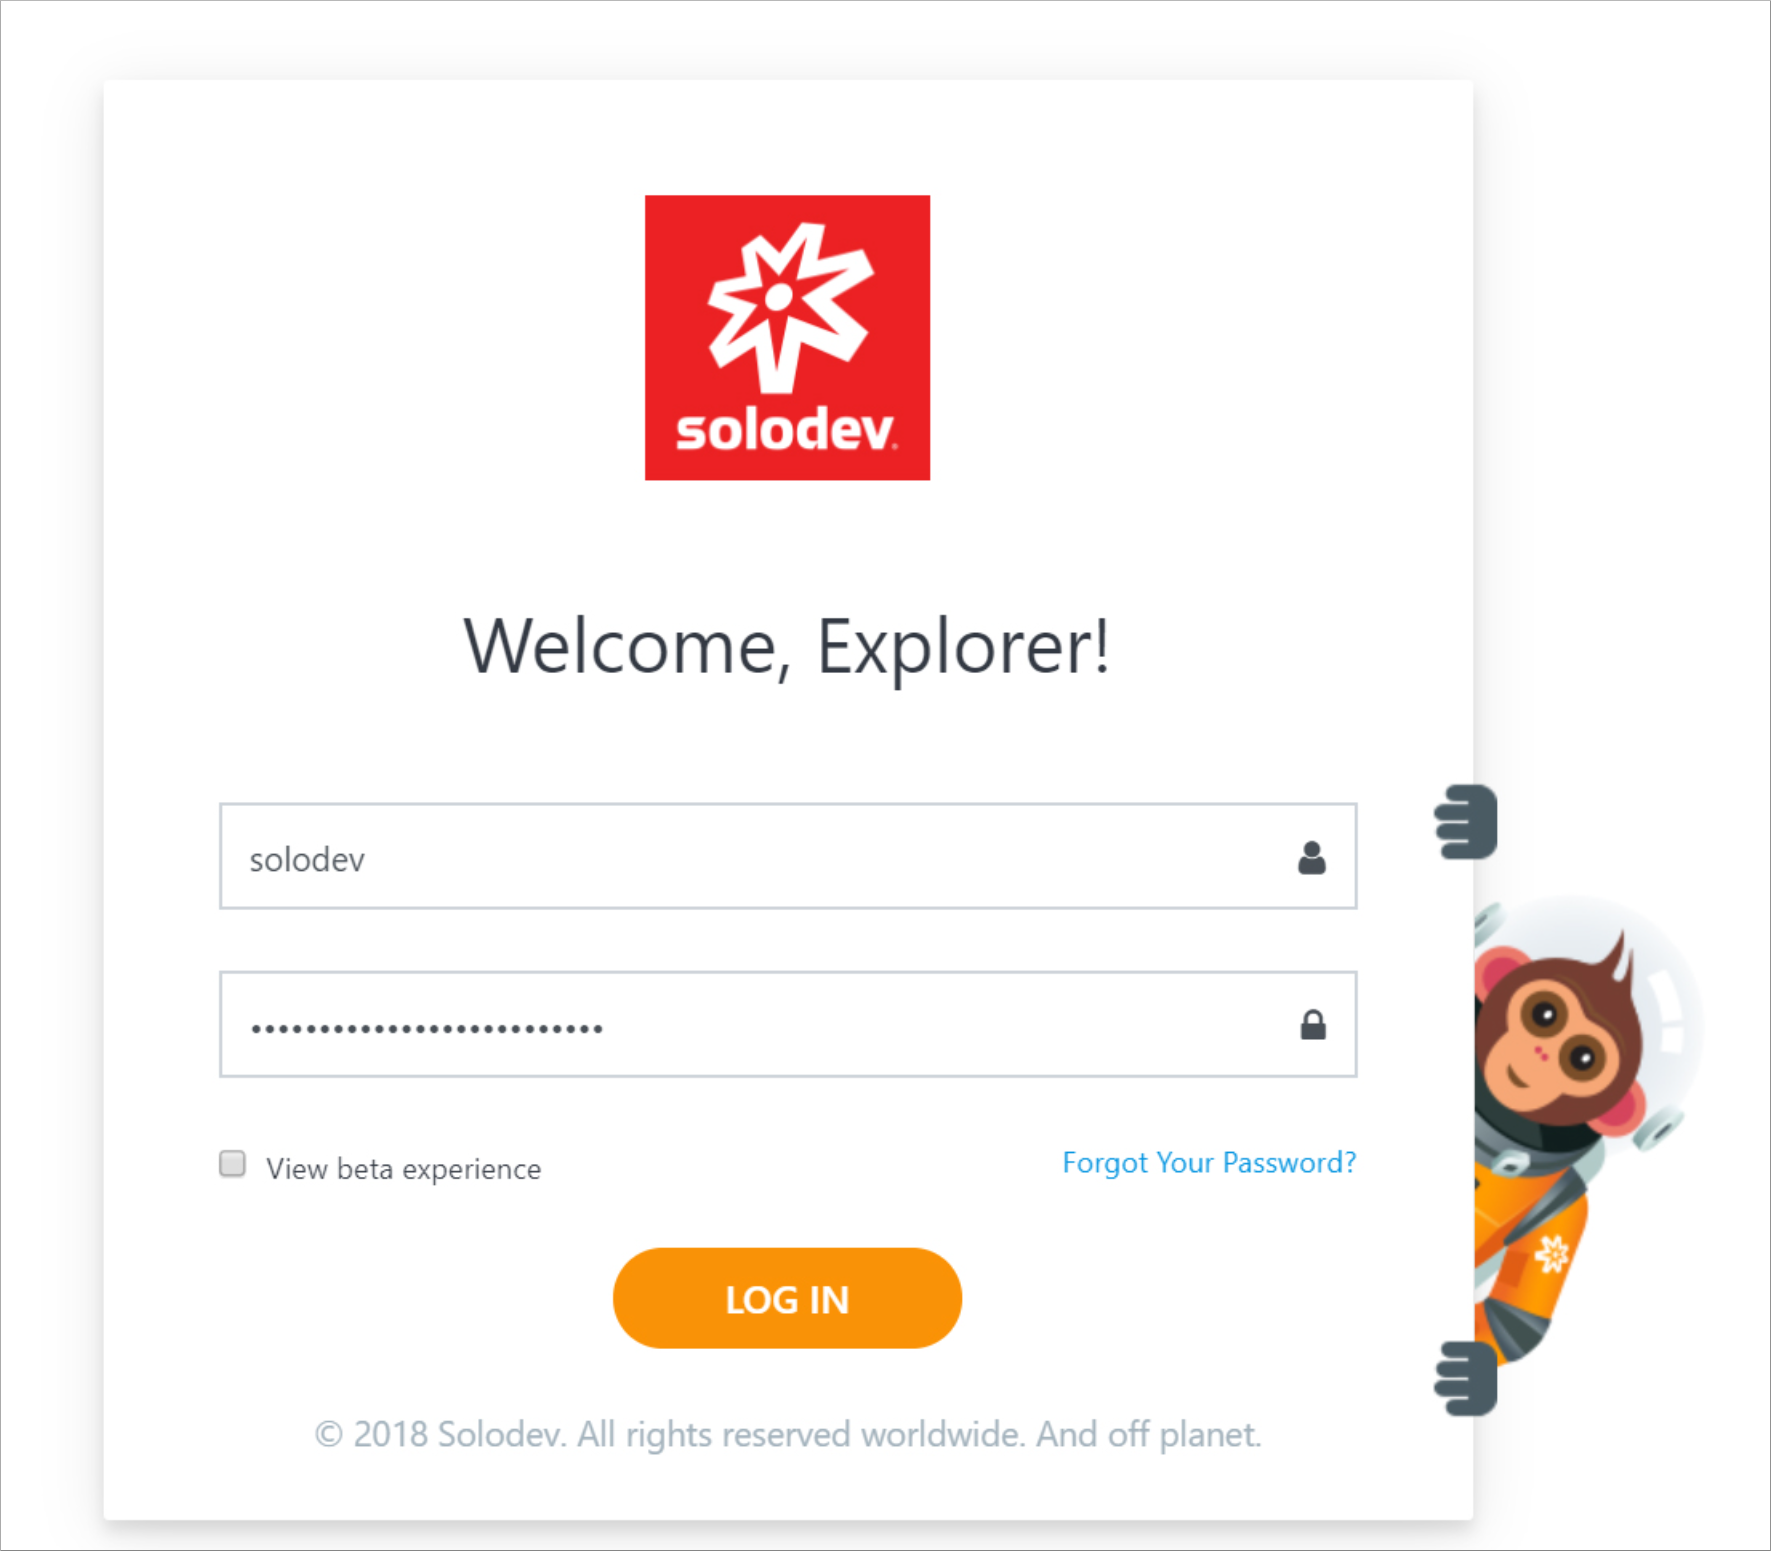
Visit the IP address or the backend domain you previously configured. Log in to Solodev using the username and the password you configured on your stack.

<p><img src="../../images/quickstart/login-screen.png" alt="Solodev CMS Login Screen" style="width: 60%;"></p>

### Add your First Website

Please [follow this link](/websites/add-website/) to learn more about Solodev and to learn how to build your first website.