#
How to add a page to a website
Once you have set up a new website in your Solodev CMS, you can begin creating pages to build out your experience. In this tutorial, you will learn how to add a page to your site, create reusable page templates with custom elements, and start adding content.
#
Prerequisites
- You will need to complete the How to add a website tutorial.
- For the examples in this tutorial, we will be using the Solodev SpaceJet theme package. Download the zip file to access the images and assets.
- As you are building with this tutorial, you can refer to the Solodev SpaceJet website to compare your progress.
- When building your own project, it is highly recommended that you have an approved design prototype and sitemap to guide your development.
#
Understanding page templates
Before adding pages to your site, it is important to understand the concept of page templates in Solodev.
Page templates are reusable components that allow you to build website pages faster and easier. They provide control over your website’s structure while giving you the freedom to customize and personalize your content.
There is no limit to the kinds of page templates you can create in Solodev, but most websites use these common types as a best practice:
Base Template: The base template is the foundation for every page of your website. It typically consists of a header, footer, and dynamic divs for adding content. As the name implies, the base template acts as the foundation for your site and can include your Google Tag Manager includes, tracking codes, scripts, and more. Because they are universal, any changes made to a base template will be reflected across all pages of your site.
Homepage Template: A homepage is the introductory page of a website. It is often the first page a visitor sees, acting as a “table of contents” for the rest of the experience. It can also feature high-level news, promotions, and other key messages that require the highest degree of visibility. While a homepage will leverage elements of your base template, such as the header and footer, there is only one homepage on a website – so generally speaking, there is only one unique template for your homepage.
Sectional Template: A sectional template is a high-level overview of a "section" of your website's content. Think of it as a jumping-off point to areas that fall under a specific content theme or topic. Sectional templates can be used in a variety of ways, but most provide a collection of snippets and links to relevant areas. For example, if a website has a section called "Departments," a sectional template might include an overview along with a list of links to all the departments. Because they are used sparingly, sectional templates generally have a distinct design from your content templates, helping them stand out.
Content Template: A content template is usually placed within the base template. Sometimes referred to as an “interior template,” content templates power the bulk of your website, and can be reused for various sections that require multiple pages.
#
Using dynamic divs
Another important concept is the use of dynamic divs. Page templates are composed of dynamic divs – or “dropzones” – where HTML and content can be inserted and arranged in various places on a website page. Dynamic divs work fluidly with the Bootstrap grid system, allowing you to easily insert content once the layout of your page has been created. Here is the simple HTML code to create a dynamic div in Solodev:
<div class="dynamicDiv"></div>Dynamic divs are the connecting elements between your HTML content and STML pages. Generally speaking, your STML pages will contain several dynamic divs, allowing you to easily insert HTML content into the page itself.
#
Creating .tpl files
When building page templates in Solodev, you will be using .tpl files, also known as template files. This is a common format used by various types of applications to store a website’s page layout and properties.
One of the key benefits of .tpl files is that they allow you to include multiple types of programming languages such as JavaScript, HTML, and PHP – all in the same file. For example, a .tpl can include HTML for rendering the navigation in a website header, but also include the JavaScript tracking codes necessary for Google Analytics.
In each of the page templates in this tutorial, you will utilize .tpl files to add fixtures such as a header, footer, navigation, and hero.
#
How to create a base template
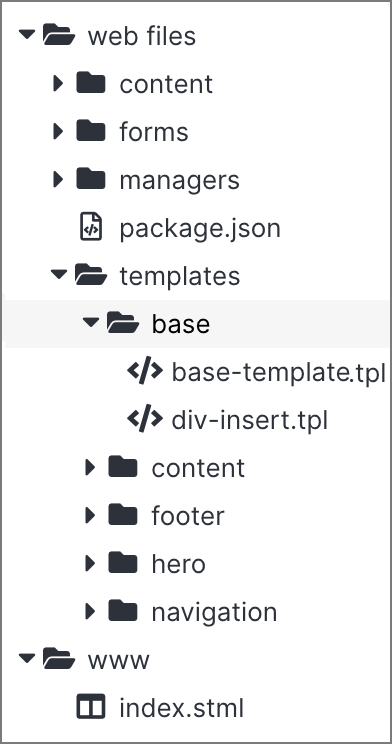
The first step in creating page templates in Solodev is to build your base template, which will serve as the foundation for page templates in your website. For the purposes of this tutorial, you will be adding a folder and file structure for building a homepage and content templates as shown in the SpaceJet theme example.
Step 1: Log into your website and enter the main dashboard. Under web files, click on the templates folder.
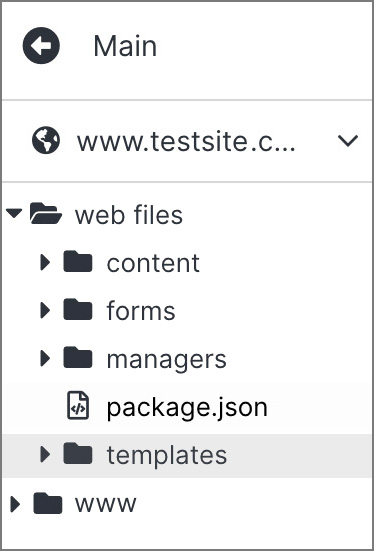
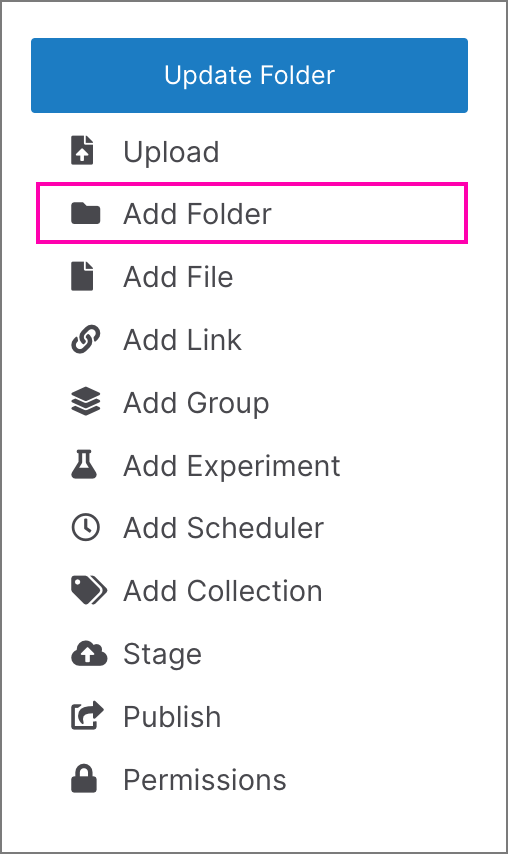
Step 2: Using the right-hand menu, click Add Folder.
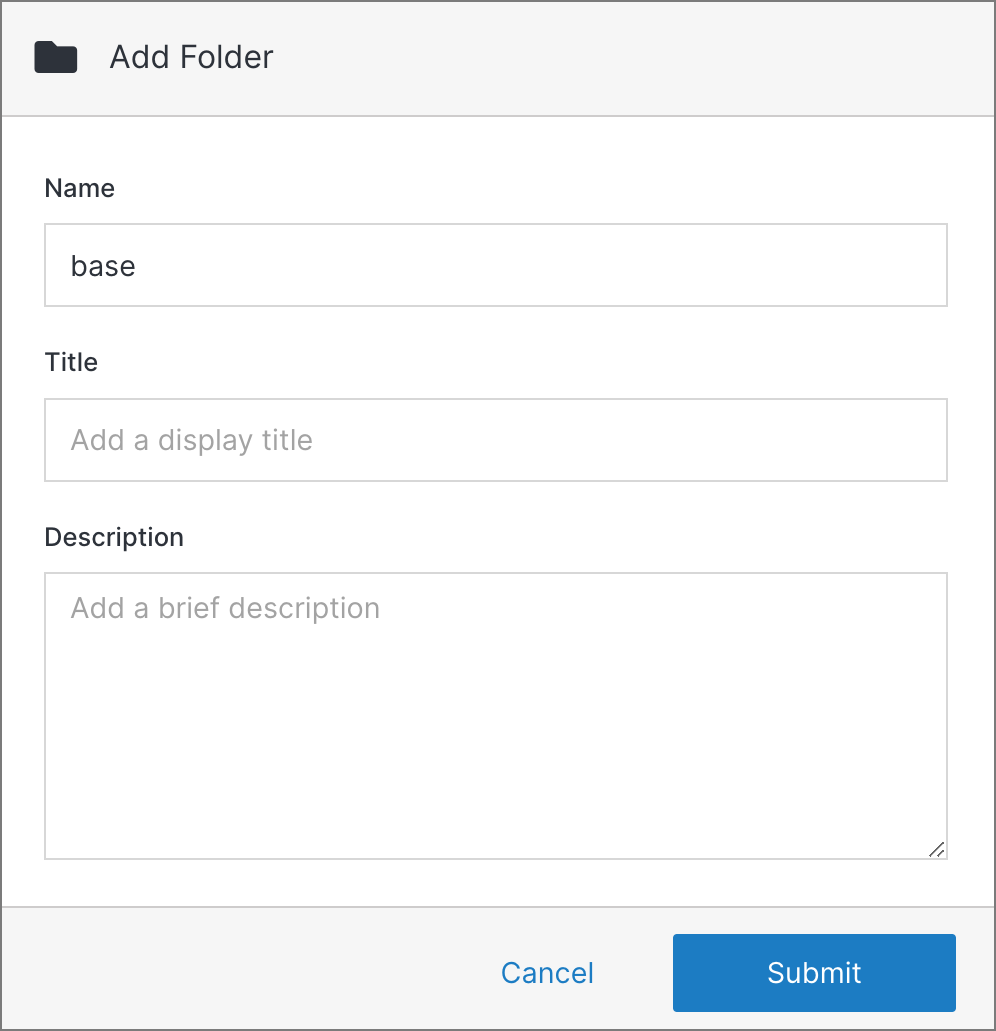
Step 3: In the Name field, add a folder called base. You can also add an optional title and description. Once complete, click Submit.
Note:
The nested base folder will house your base template and other components.
Step 4: Click back on the templates folder. Using the same right-hand menu, click Add File.
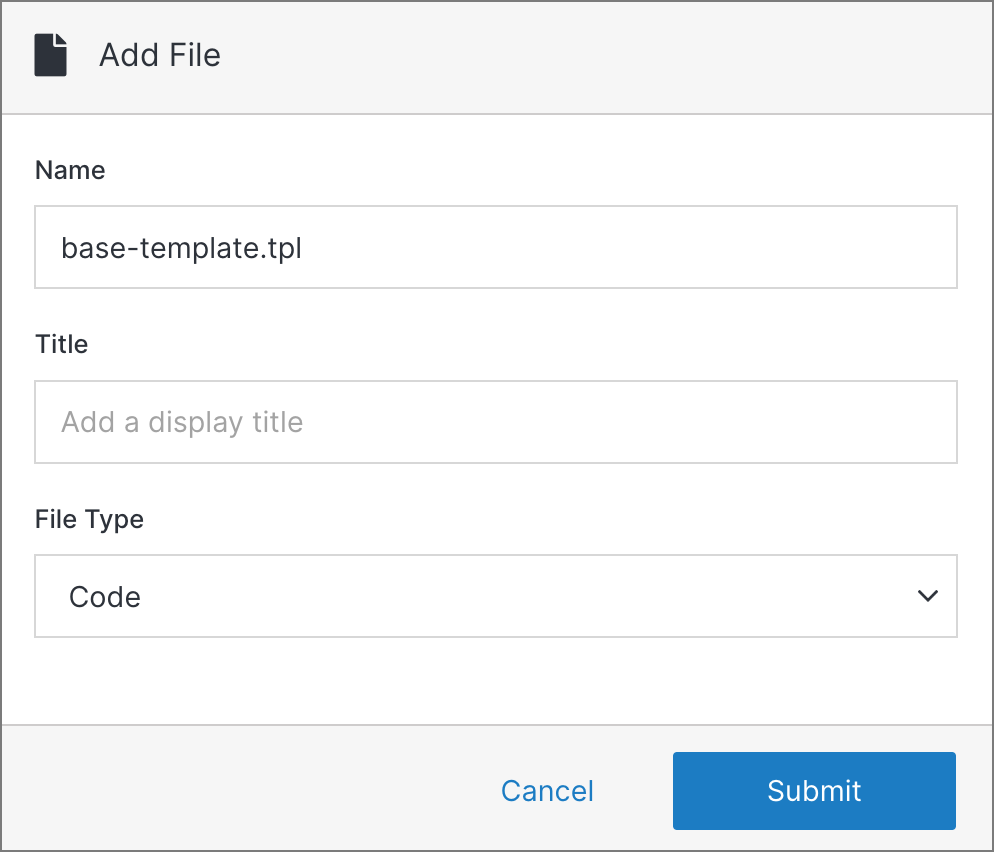
Step 5: In the fields provided, give your file a Name (such as “base-template”) and remember to use the .tpl extension. From the File Type dropdown, select Code, and click Submit.
Note:
A .tpl file should be designated as “Code” in the File Type to ensure that it can include your HTML, JavaScript, and PHP components.
Step 6: On your new file paste the sample code below into the editor. The sample includes dynamicDiv classes for the top navigation, hero, content, and footer. Once complete, click Publish.
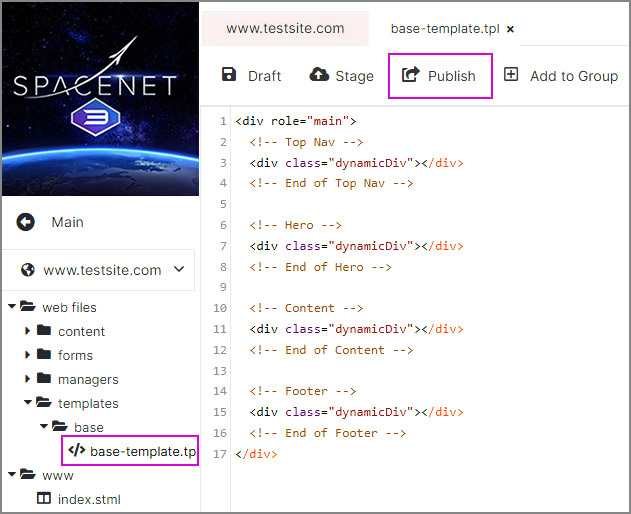
<div role="main">
  <!-- Top Nav -->
  <div class="dynamicDiv"></div>
  <!-- End of Top Nav -->

  <!-- Hero -->
  <div class="dynamicDiv"></div>
  <!-- End of Hero -->

  <!-- Content -->
  <div class="dynamicDiv"></div>
  <!-- End of Content -->

  <!-- Footer -->
  <div class="dynamicDiv"></div>
  <!-- End of Footer -->
</div>Note:
You can always add more dynamic divs as needed.
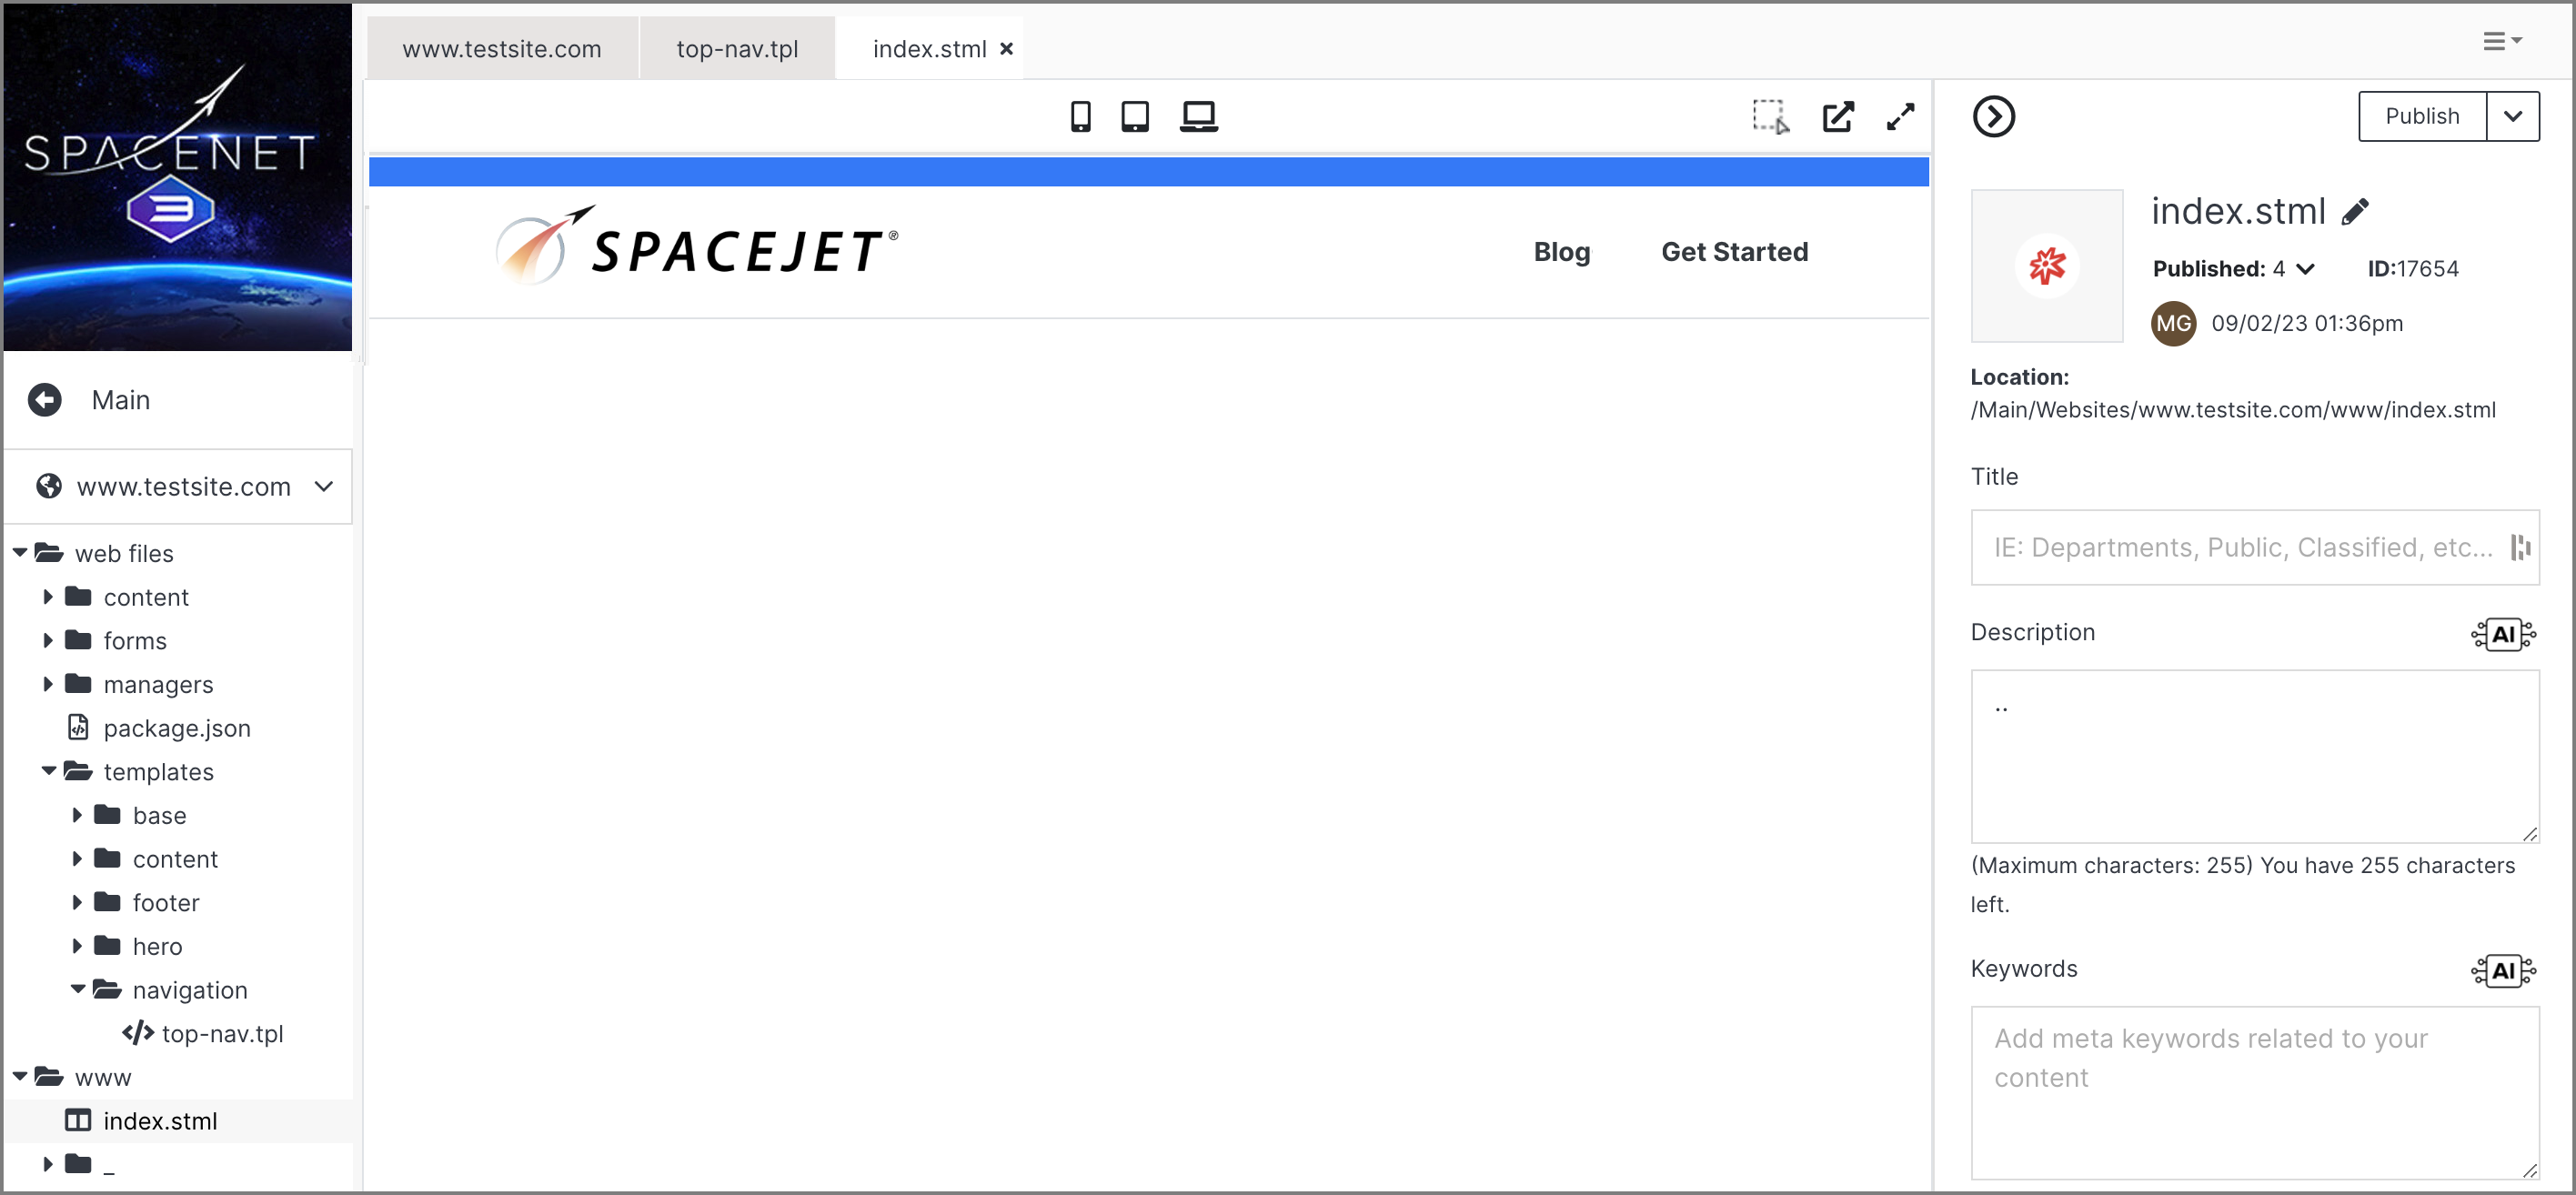
Step 7: Under the www folder, click on the index.stml file – which will become your homepage. Then, click in the main content area where the two dots are located.
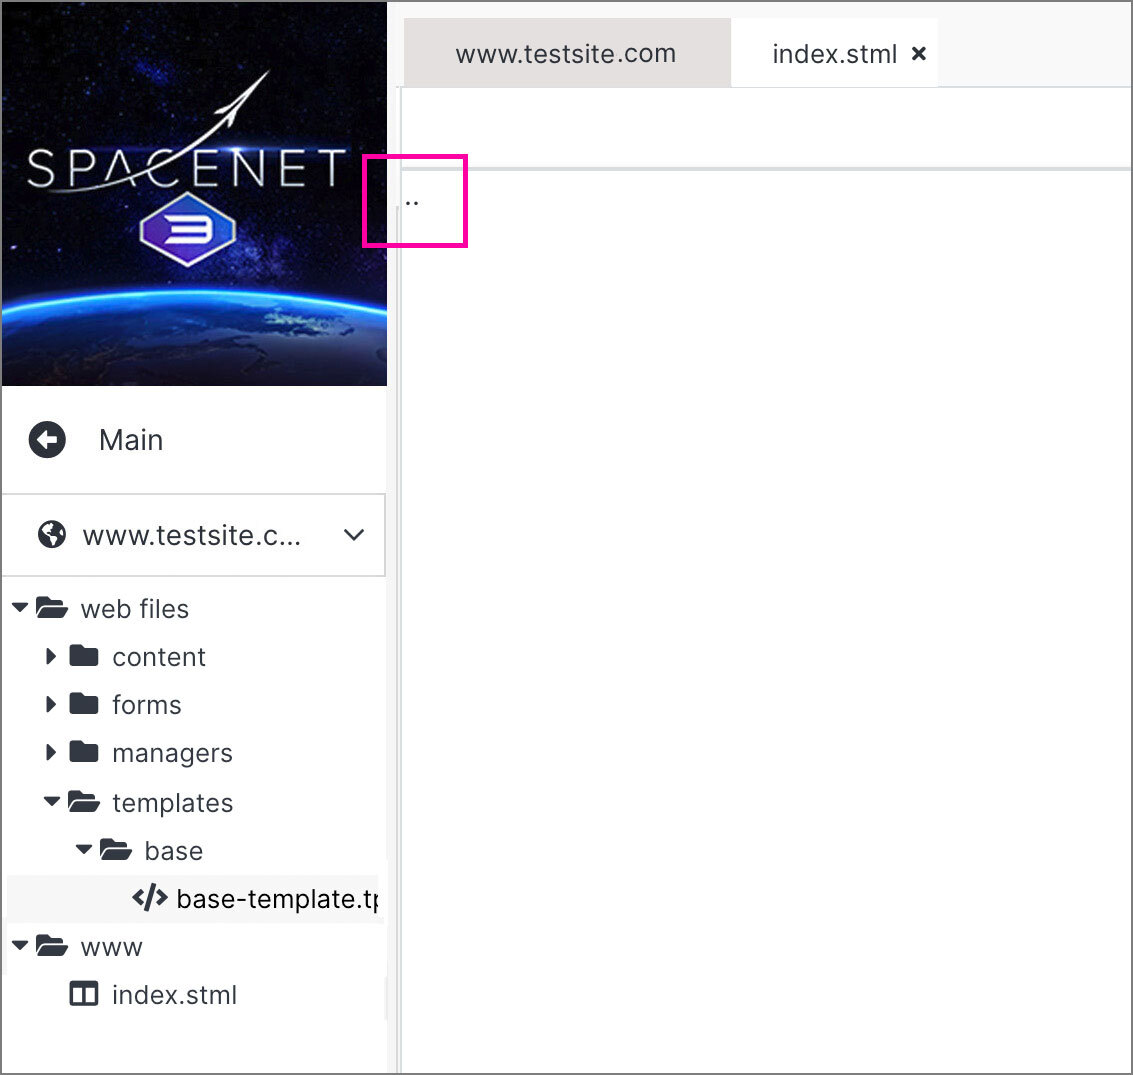
Note:
The two dots are a default indicator on all blank pages and can be removed during editing.
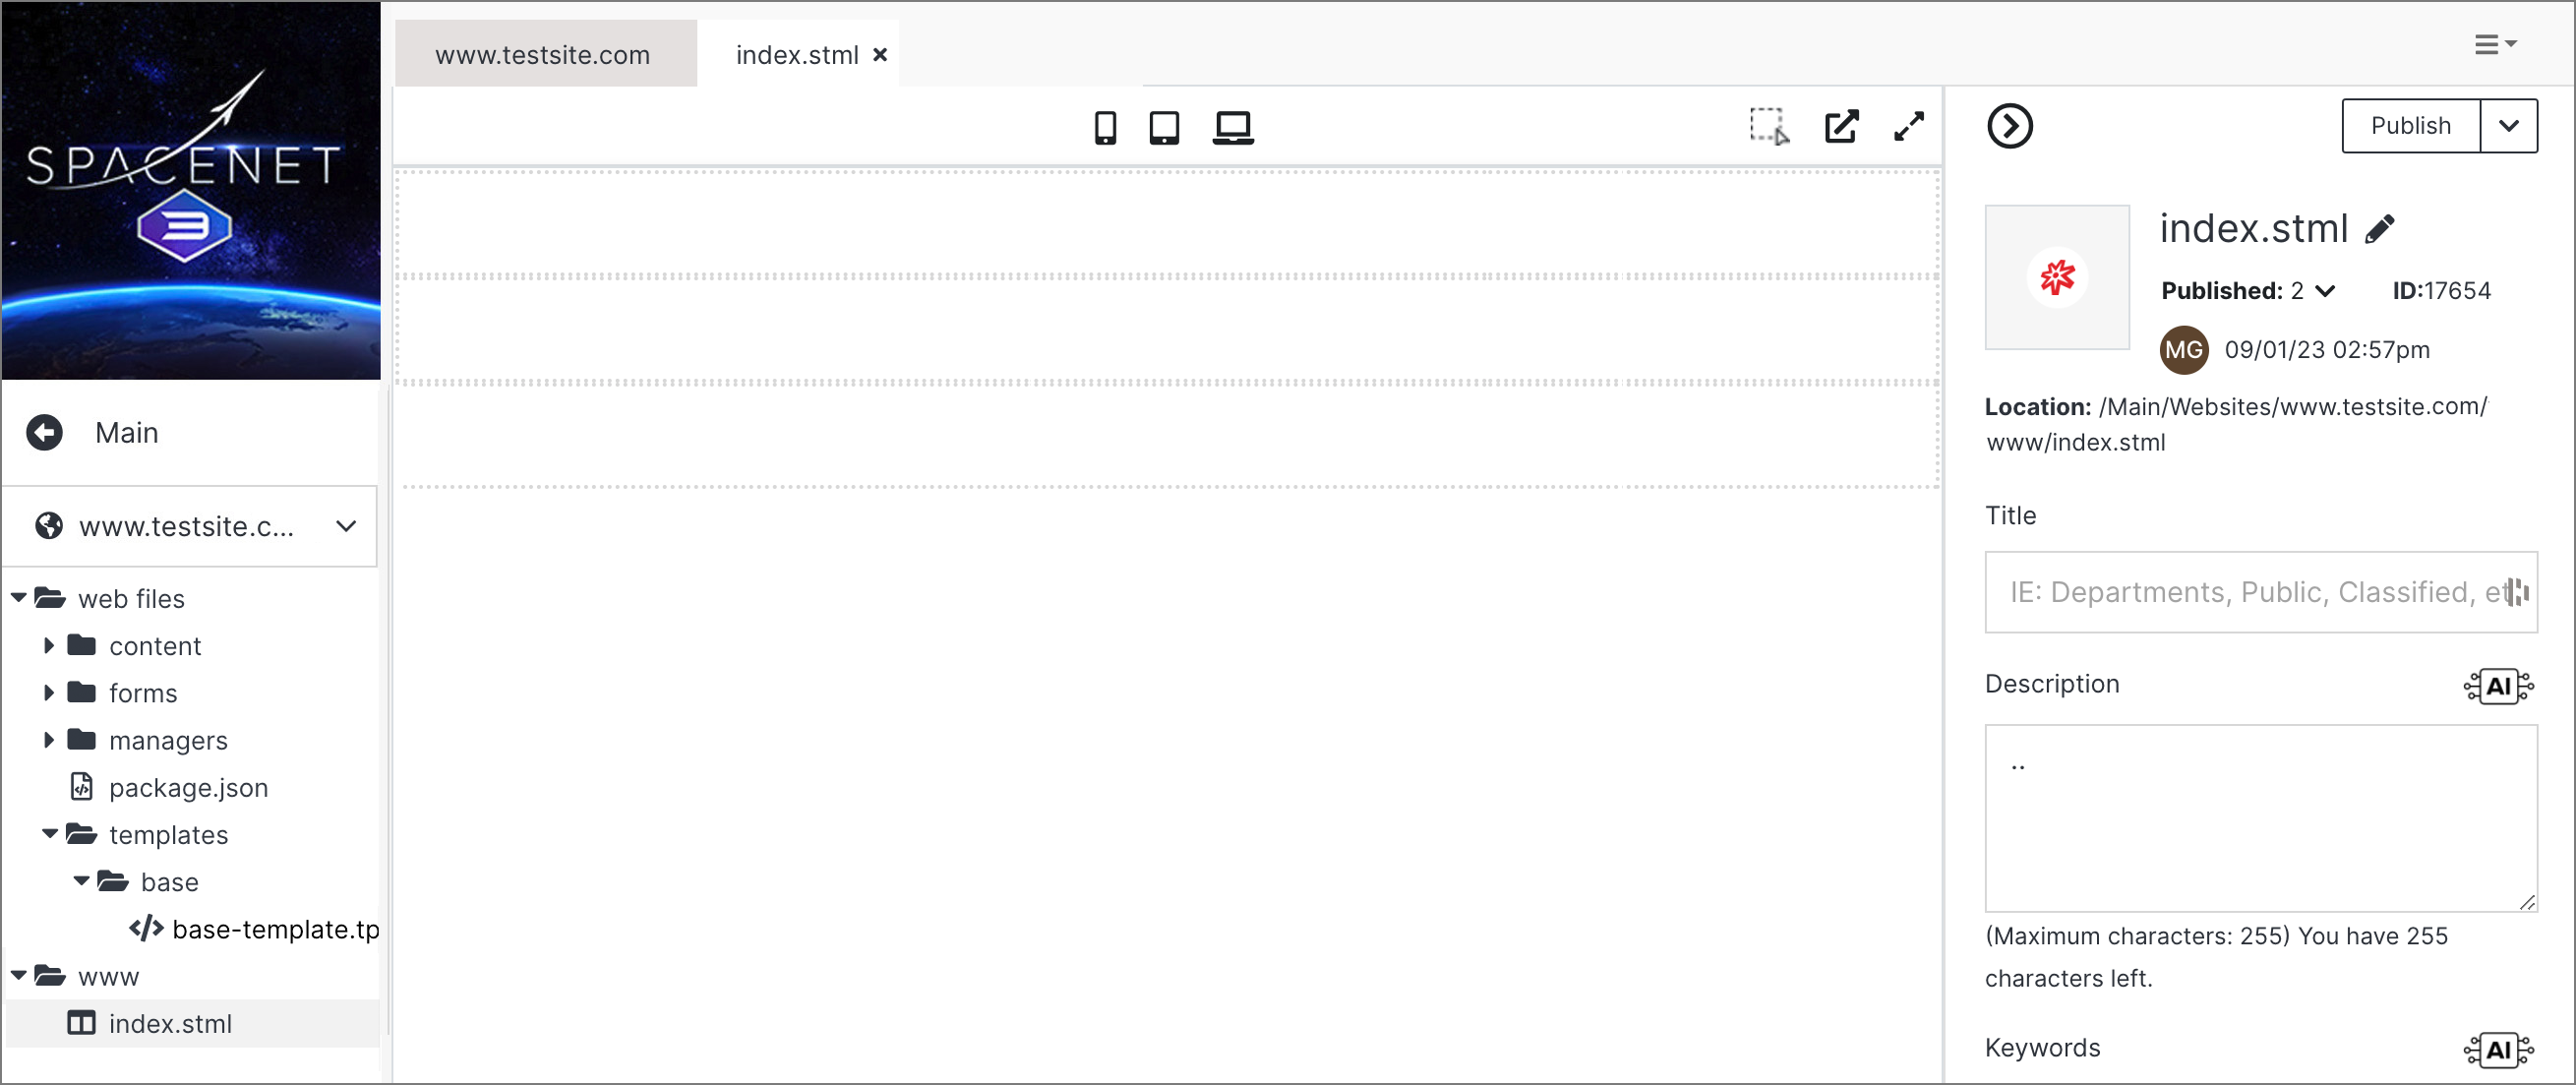
Step 8: After clicking on the two dots, the areas will become active, displaying the dynamic divs as a stack of rectangular boxes set in a light blue color. The name of your base template file will also appear in the upper left.

Step 9: Next, click on your base template file under the templates folder in the left menu. This will apply your base template to the dynamic div. Then, click Publish in the upper right corner.
Step 10: Once published, your index.stml page will refresh, displaying your dynamic divs in white. You are now ready to build your page templates.
Note:
You can repeat this process for all additional page templates in your website.
#
How to create a homepage template
Using the base template with your index.stml page, you can now build out your homepage template. As noted, the homepage is typically a unique template in your website template system; in most cases, it will not be repeated elsewhere on your website.
For this tutorial, we will use the assets from the SpaceJet theme to create a homepage with a header, hero, CTA (call-to-action) banner, footer, and content areas. You can view the live SpaceJet sample site to view the final homepage.
#
Setting up your folders and .tpl files
Step 1: Under web files, click on the templates folder.
Step 2: Using the right-hand menu, click Add Folder. Under templates, add four folders with the following names:
- content
- footer
- hero
- navigation
When complete, click Submit.
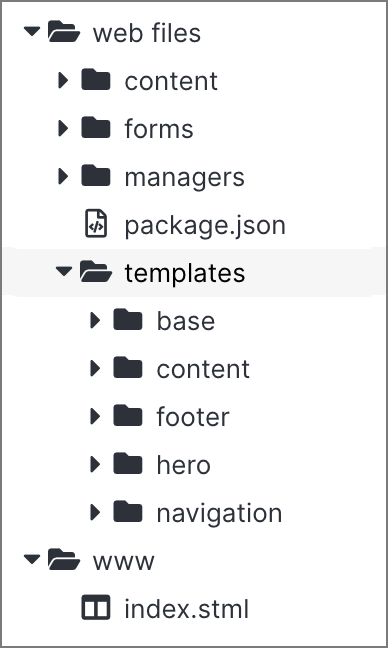
Step 3: Under templates, click on the base folder. In the right menu, click Add File. Create a new file named div-insert.tpl and select Code from the File Type dropdown. When complete, click Submit.
Note:
The additional div-insert.tpl file will provide extra dynamicDivs to your page template.
Step 4: In each of the new folders, you will need to add a new .tpl file. Follow the previous steps to click on each folder and Add File. Create a new file under each folder as follows, and select Code for the File Type. Once complete, click Submit:
- content: cta.tpl, home-blog.tpl, main.html
- footer: footer.tpl
- hero: home-hero.tpl
- navigation: top-nav.tpl

Now you have a complete set of folders and .tpl files to build out your homepage.
#
Adding templates to your dynamic divs
Next, you will learn how to apply your .tpl files to your dynamic divs. For the purposes of this lesson, will continue using sample code from the SpaceJet theme. To ensure that the images referenced in the theme appear in your editor, you will need to upload several files to your website’s image folder.
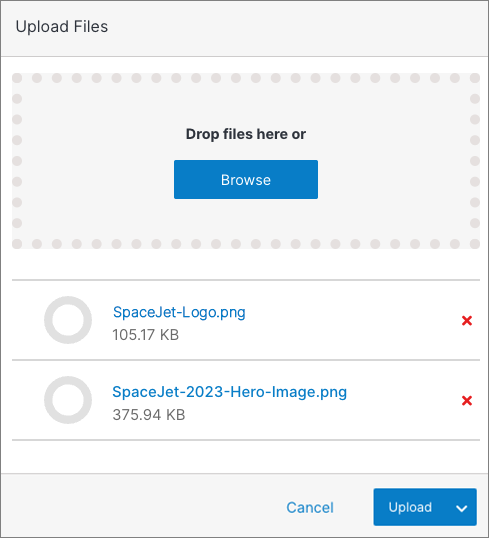
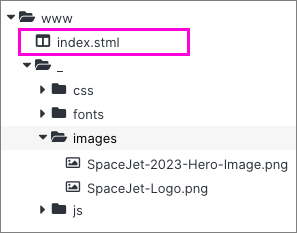
Step 1: Locate the following assets in the SpaceJet package you previously downloaded:
- SpaceJet-Logo.png (located in _ > images)
- SpaceJet-2023-Hero-Image.png (located in _ > images)
Step 2: Under the www folder, click on the images folder under the “_” folder.
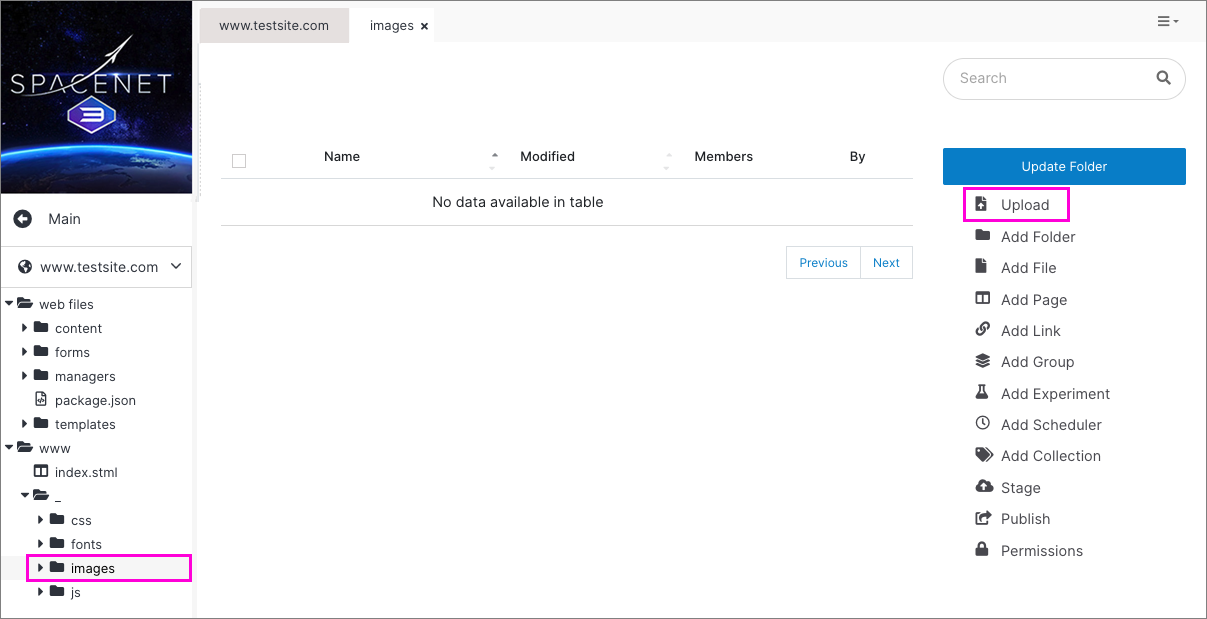
Step 3: Using the right-hand menu, click Upload. Drag both images from your local computer into the window and click Upload.
Note:
For more details on how to upload images to your website in Solodev, read the Upload article under Manage Folder in Websites.
Step 4: Under web files, browse to the navigation folder and click on the top-nav.tpl file. Copy the code sample below into the editor. When complete, click Publish.
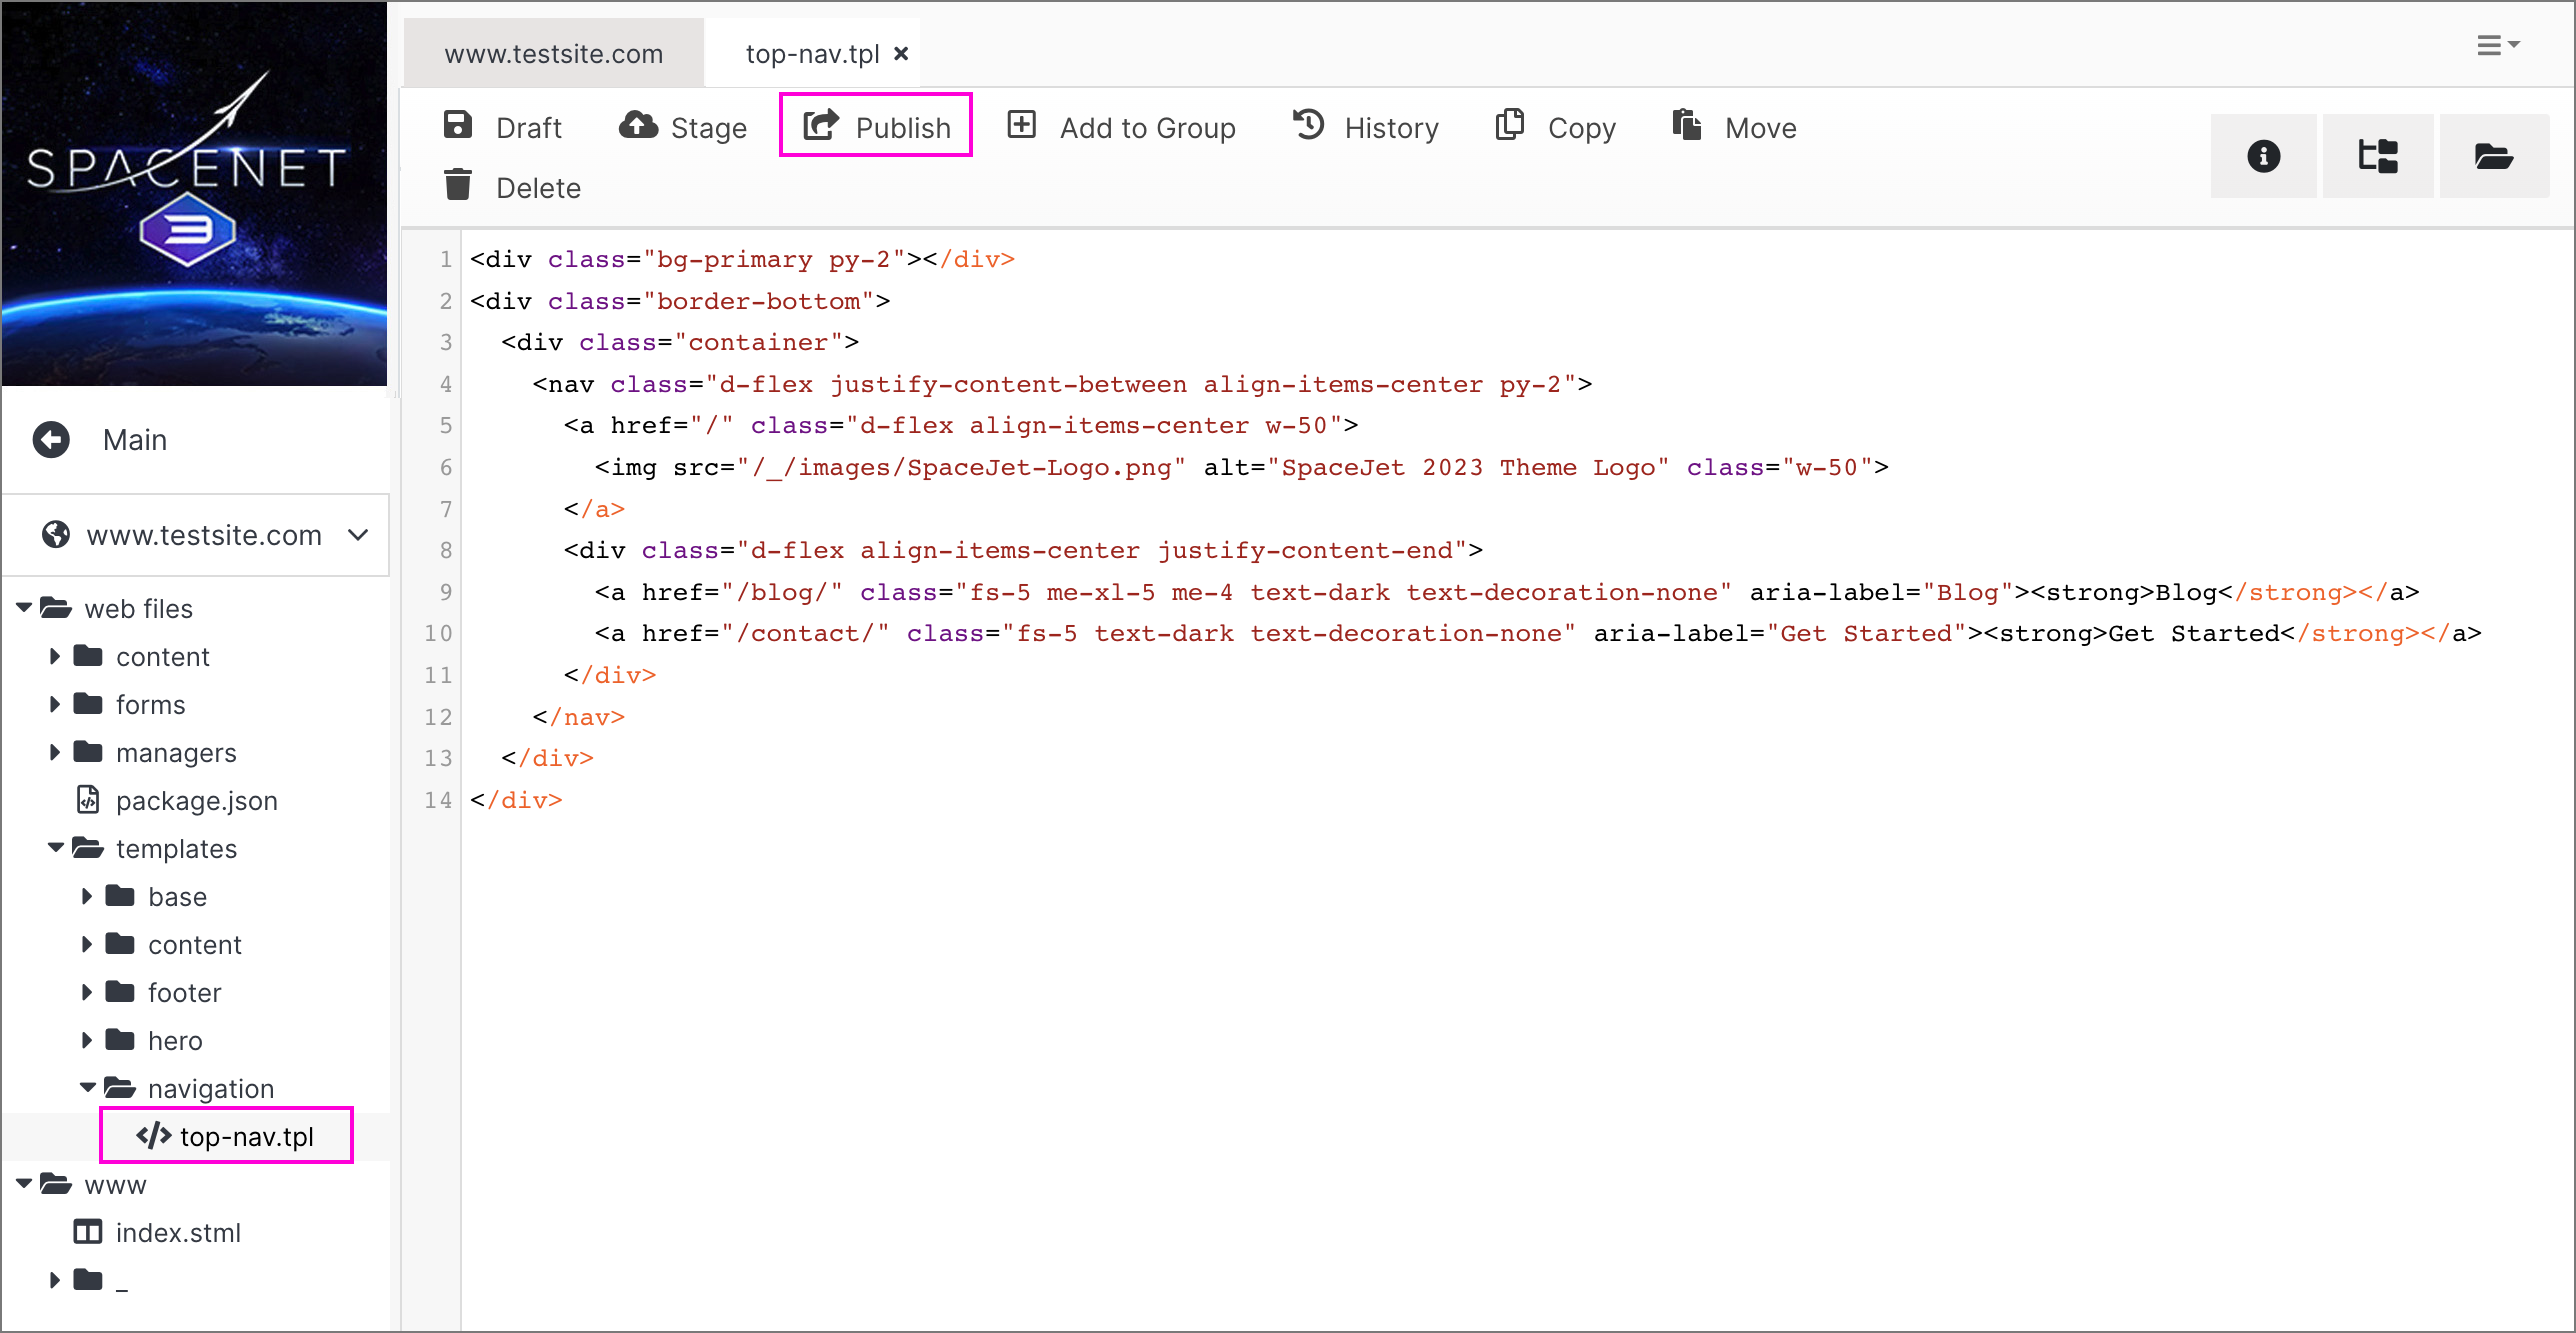
<div class="bg-primary py-2"></div>
<div class="border-bottom">
  <div class="container">
    <nav class="d-flex justify-content-between align-items-center py-2">
      <a href="/" class="d-flex align-items-center w-50">
        <img src="/_/images/SpaceJet-Logo.png" alt="SpaceJet 2023 Theme Logo" class="w-50">
      </a>
      <div class="d-flex align-items-center justify-content-end">
        <a href="/blog/" class="fs-5 me-xl-5 me-4 text-dark text-decoration-none" aria-
label="Blog"><strong>Blog</strong></a>
        <a href="/contact/" class="fs-5 text-dark text-decoration-none" aria-label="Get
Started"><strong>Get Started</strong></a>
      </div>
    </nav>
  </div>
</div>
Step 5: Under the www folder, click on the index.stml file.
Step 6: In the top dynamic div, click anywhere in the base-template.tpl div. Once activated, it will turn blue, indicating that it is ready to have a template applied to it.
Next, under web files, open the templates folder and browse to the navigation folder. Click on the top-nav.tpl file. The tag will change from base-template.tpl to top-nav.tpl, as shown:
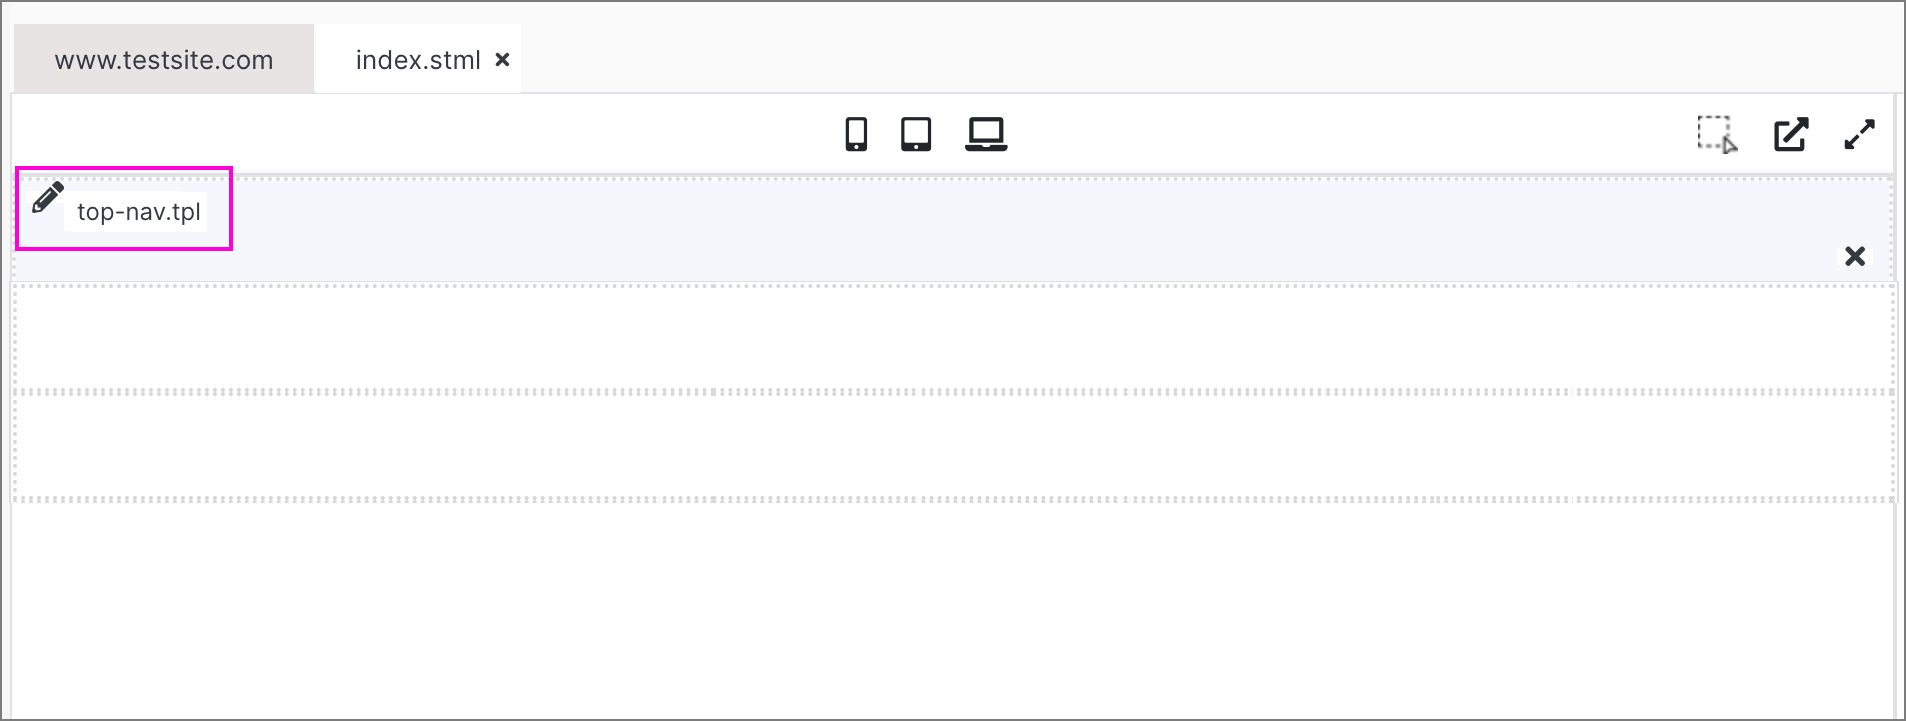
Once complete, click Publish. After your page reloads, you will see the top navigation appear in your index.stml file.
Note:
Solodev provides a rich visual editing experience. The editor renders a preview of your frontend website, but minor differences may occur due to the software’s features and functionality. This can affect the appearance of fonts and images within the editor. You can compare your progress to the live SpaceJet sample site.
Step 7: Repeating steps 4 and 5, add the code samples below for the other divs of the SpaceJet homepage:
home-hero.tpl
<div class="hero-slider h-100">
  <div data-background="/_/images/SpaceJet-2023-Hero-Image.png" class="item h-100 d-lg-flex align-items-
center">
    <div class="container position-relative py-5 my-5">
      <div class="row">
        <div class="col-lg-9 col-xl-8 col-xxl-6">
          <div class="bg-white p-5 rounded">
            <h1 class="fw-bolder display-5"><strong>Your Liftoff to Luxury Space Travel</strong></h1>
            <p class="mt-4 fs-5">Book your next trip on SpaceJet and explore a step above.</p>
            <div class="d-flex justify-content-between align-items-center mt-4">
              <a href="/contact" class="btn fs-5 btn-danger text-white px-4 py-1 pb-2"><strong>Get
Started</strong></a>
            </div>
          </div>
        </div>
      </div>
    </div>
  </div>
</div>
cta.tpl
<div class="bg-primary text-white py-5 mt-5">
  <div class="container">
    <div class="text-center">
      <h2 class="display-5 fw-bolder"><strong>Start your space journey</strong></h2>
      <p class="fs-5 mt-3">Talk to one of our crew members to plan your trip</p>
      <a href="/contact/" class="btn fs-5 btn-danger text-white px-4 py-1 pb-2 mt-3"><strong>Get
Started</strong></a>
    </div>
  </div>
</div>
footer.tpl
<footer class="mt-auto">
<div class="container">
<div class="row row-cols-1 row-cols-sm-3 py-2 align-items-center mt-3 mt-md-0">
<div class="col">
<a href="/" class="d-flex align-items-center">
<img src="/_/images/SpaceJet-Logo.png" alt="SpaceJet 2023 Theme Logo" class="w-50">
</a>
</div>
<div class="col">
<div class="d-flex align-items-center justify-content-center">
<p class="mb-0"><a href="/about/" class="text-dark text-decoration-none me-md-5 me-3"><strong>About</strong></a></p>
<p class="mb-0"><a href="/blog/" class="text-dark text-decoration-none me-md-5 me-3"><strong>Blog</strong></a></p>
<p class="mb-0"><a href="/contact/" class="text-dark text-decoration-none"><strong>Get Started</strong></a></p>
</div>
</div>
<div class="col">
<ul class="list-unstyled d-flex justify-content-end mb-0">
<li><a href="https://www.twitter.com" class="text-dark text-decoration-none" target="_blank" rel="noopener noreferrer"><span class="fa-fw fa-brands me-2 fa-lg fa-twitter"></span><span class="sr-only">Twitter</span></a></li>
<li><a href="https://www.facebook.com" class="text-dark text-decoration-none" target="_blank" rel="noopener noreferrer"><span class="fa-fw fa-brands me-2 fa-lg fa-facebook-f"></span><span class="sr-only">Facebook</span></a></li>
<li><a href="https://www.linkedin.com" class="text-dark text-decoration-none" target="_blank" rel="noopener noreferrer"><span class="fa-fw fa-brands me-2 fa-lg fa-linkedin-in"></span><span class="sr-only">Linkedin</span></a></li>
</ul>
</div>
</div>
</div>
<div class="bg-light py-2">
<div class="container">
<div class="d-flex justify-content-between align-items-center flex-md-row flex-column">
<p class="small mb-0 mt-3 mt-md-0">©2023 SpaceJet. Built on <a href="https://github.com/solodev/marketplace/raw/master/depot/themes/solodev-spacejet-2023.zip" class="text-dark">SpaceJet Theme</a> and powered by <a href="https://www.solodev.com" target="_blank" rel="noopener noreferrer" class="text-dark">Solodev</a>.</p>
<ul class="list-unstyled d-inline-flex mb-0 mt-3 mt-md-0 small">
<li><a href="/privacy.stml" class="text-dark me-3">Privacy</a></li>
<li><a href="/legal.stml" class="text-dark">Legal</a></li>
</ul>
</div>
</div>
</div>
</footer>Step 8: To add more space to the page for the main content areas, repeat steps 4 and 5 and add these additional code samples:
Note:
For HTML file click on source in the bar and then paste the code.
main.html
<div class="container">
  <div class="row justify-content-between align-items-center mt-5 pt-5">
    <div class="col-md-8 col-lg-5 mx-auto ms-lg-0">
      <img src="/_/images/SpaceJet-2023-Jet-Image-1.jpg" alt="SpaceJet 2023 Jet" class="img-fluid rounded-4">
    </div>
    <div class="col-lg-6 mt-lg-0 mt-5">
      <div class="text-center text-lg-start">
        <p><strong>HOW IT WORKS</strong></p>
        <h2 class="display-5 fw-bolder"><strong>Plan Your Itinerary and Choose a Spaceport</strong></h2>
        <p class="mt-3">Now you can travel beyond your expectations – from earth's orbit to the moon and beyond – all with the ease and comfort of booking terrestrial travel. Choose from a wide range of destinations, then select one of our convenient SpacePorts from around the globe, with more coming soon.</p>
        <ul class="fw-bolder ps-3 d-inline d-sm-table d-lg-inline-block mx-auto text-sm-start text-center">
          <li>SkyDrift Hotel – Low Earth Orbit (LEO)</li>
          <li>Armstrong Spacewalk Experience Platform</li>
          <li>Four Seasons at the Sea of Tranquility</li>
          <li>LunarXP Connector to Lovell Mines</li>
          <li>Mars Colony Connector</li>
        </ul>
      </div>
    </div>
  </div>
</div>
home-blog.tpl
<div class="mt-5 py-lg-5">
  <div class="container">
    <div class="text-center">
      <h2 class="display-5 fw-bolder"><strong>Blog</strong></h2>
      <p>Learn what's happening on the final frontier</p>
    </div>
    <div class="row row-cols-1 row-cols-md-2 row-cols-lg-3 g-5 mt-4">
      <div class="col mt-4">
        <div class="card rounded-4 shadow border-0">
          <img src="/_/images/SpaceJet-2023-Astronaut-Image.jpg" alt="Astronaut" class="img-fluid rounded-top-4">
          <div class="card-body text-center text-sm-start p-4">
            <p class="pt-1">August 28, 2023</p>
            <h3 class="mt-3 fw-bolder"><strong>Experience amazing views of Earth on a guided SpaceWalk</strong></h3>
            <a href="/" class="btn fs-6 btn-danger text-white my-3"><strong>Learn More</strong></a>
          </div>
        </div>
      </div>
      <div class="col mt-4">
        <div class="card rounded-4 shadow border-0">
          <img src="/_/images/SpaceJet-2023-Cabin-Image.jpg" alt="Space Class cabins" class="img-fluid rounded-top-4">
          <div class="card-body text-center text-sm-start p-4">
            <p class="pt-1">August 25, 2023</p>
            <h3 class="mt-3 fw-bolder"><strong>Space Class seats offer a whole new galaxy of luxury</strong></h3>
            <a href="/" class="btn fs-6 btn-danger text-white my-3"><strong>Learn More</strong></a>
          </div>
        </div>
      </div>
      <div class="col mt-4">
        <div class="card rounded-4 shadow border-0">
          <img src="/_/images/SpaceJet-2023-Jet-Image-2.jpg" alt="SpaceJet" class="img-fluid rounded-top-4">
          <div class="card-body text-center text-sm-start p-4">
            <p class="pt-1">August 23, 2023</p>
            <h3 class="mt-3 fw-bolder"><strong>SpaceJet expands ports to include Sea of Tranquility Resort</strong></h3>
            <a href="/" class="btn fs-6 btn-danger text-white my-3"><strong>Learn More</strong></a>
          </div>
        </div>
      </div>
    </div>
  </div>
</div>
Once complete, your final homepage should appear in the editor, featuring the top navigation, hero, CTA, and footer. The blog section will be covered in the Modules tutorial.
#
How to create a Sectional template
As previously noted, a sectional template is a high-level overview of a "section" of your website's content. They are typically reserved for larger sites with more pages to organize and are completely optional. In this lesson, you will learn how to add a sample sectional template from the SpaceJet theme package.
Note:
Many of the instructions in this lesson will repeat steps from the previous homepage template. Make sure to complete that first and refer back as needed.
#
Setting up your folders and .tpl files
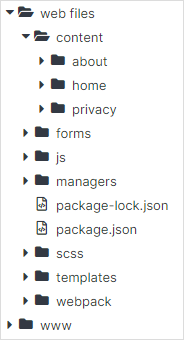
Step 1: Under web files, click on the content folder.
Step 2: Using the right-hand menu, click Add Folder. Under content, add folder called about. Click Submit, when complete.
Step 3: Now you will need to add a new .tpl file into the folder you have just created. Under content, click on the about folder and on the right menu, click Add File. Create a new file called about.tpl and select Code for the File Type. Once complete, click Submit.
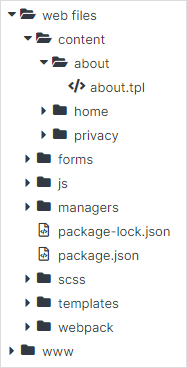
Step 4: You will also need to add a new .tpl file into the folder listed below. Under templates, click on the correct folder and on the right menu, click Add File. Create a new file under the folder and select Code for the File Type. Once complete, click Submit:
- content: full-width-template.tpl
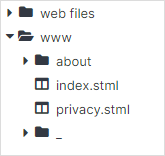
Step 5: Click on the www folder and on the right menu, click Add Folder, and add folder called about. Click Submit, when complete.
#
Adding templates to your dynamic divs
Step 1: Click on the about folder and on the right menu, click Add Page. Create a new page called index.stml. Once complete, click Submit.
Step 2: Just like in the case of homepage, with the base folder opened, click in the top dynamic div. Once activated, click on the base-template.tpl file. Once complete, click Publish.
Step 3: Repeat step 3 from the homepage steps, and add top-nav.tpl, and the footer.tpl in correct places. Once done, click Publish.
Note:
This tutorial assumes that you had finished How to create a homepage template therefore you have some files and folders in place. In case you didn't follow the How to create a homepage template, please finish it first.
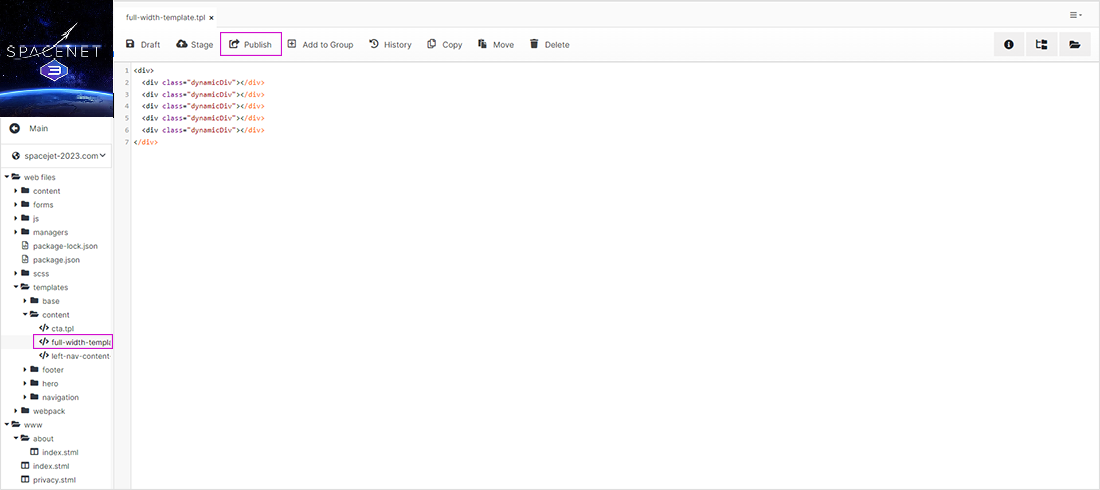
Step 4: Repeat step 3 from the homepage steps, and add the full-width-template.tpl with the following code:
<div>
  <div class="dynamicDiv"></div>
  <div class="dynamicDiv"></div>
  <div class="dynamicDiv"></div>
  <div class="dynamicDiv"></div>
  <div class="dynamicDiv"></div>
</div>
Step 5: Repeat step 3 from the homepage steps, and add about.tpl containing your about page content, for example:
Here is my about page.
#
How to create a Content page template
As previously noted, a content template – sometimes referred to as an "interior template" – powers the bulk of your website and can be reused for various sections that require multiple pages. In this lesson, you will learn how to add a sample content template from the SpaceJet theme package.
Note:
Many of the instructions in this lesson will repeat steps from the previous homepage template. Make sure to complete that first and refer back as needed.
#
Setting up your folders and .tpl files
Step 1: Under web files, click on the content folder.
Step 2: Using the right-hand menu, click Add Folder. Under content, add folder called privacy. Click Submit, when complete.
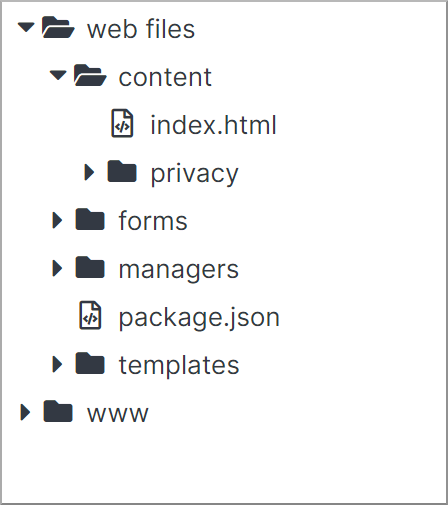
Step 3: Now you will need to add a new .html file into the folder you have just created. Under content, click on the privacy folder and on the right menu, click Add File. Create a new file called privacy.html, and select HTML for the File Type. Once complete, click Submit.
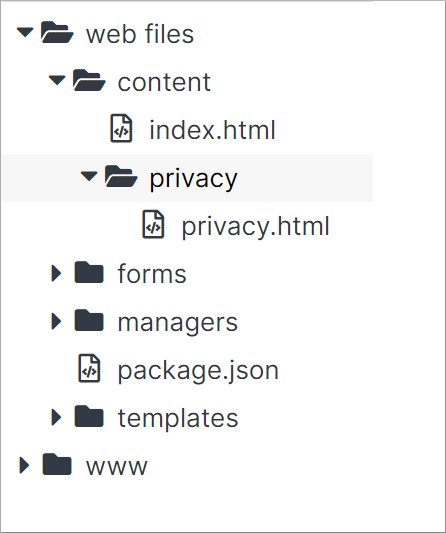
Step 4: You will also need to add a new .tpl files into a folders listed below. Under templates, click on the correct folder and on the right menu, click Add File. Create a new file under each folder, and select Code for the File Type. Once complete, click Submit:
- content: left-nav-content-template.tpl
- navigation: left-nav.tpl
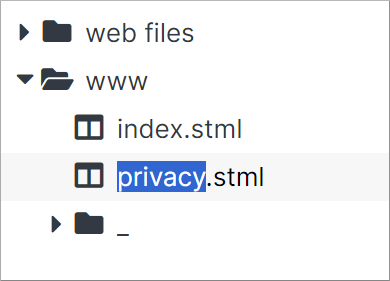
Step 5: Finally click on the www folder and on the right menu, click Add Page. Create a new page called privacy.stml. Once complete, click Submit:
Now you have a complete set of folders and .tpl files to build out your content page.
#
Adding templates to your dynamic divs
Next, you will apply your .tpl files to your dynamic divs just like you did in the case of homepage. For the purposes of this lesson, will continue using sample code from the SpaceJet theme.
Step 1: Under web files, browse to the templates/content folder and click on the left-nav-content-template.tpl file. Copy the code sample below into the editor. When complete, click Publish.
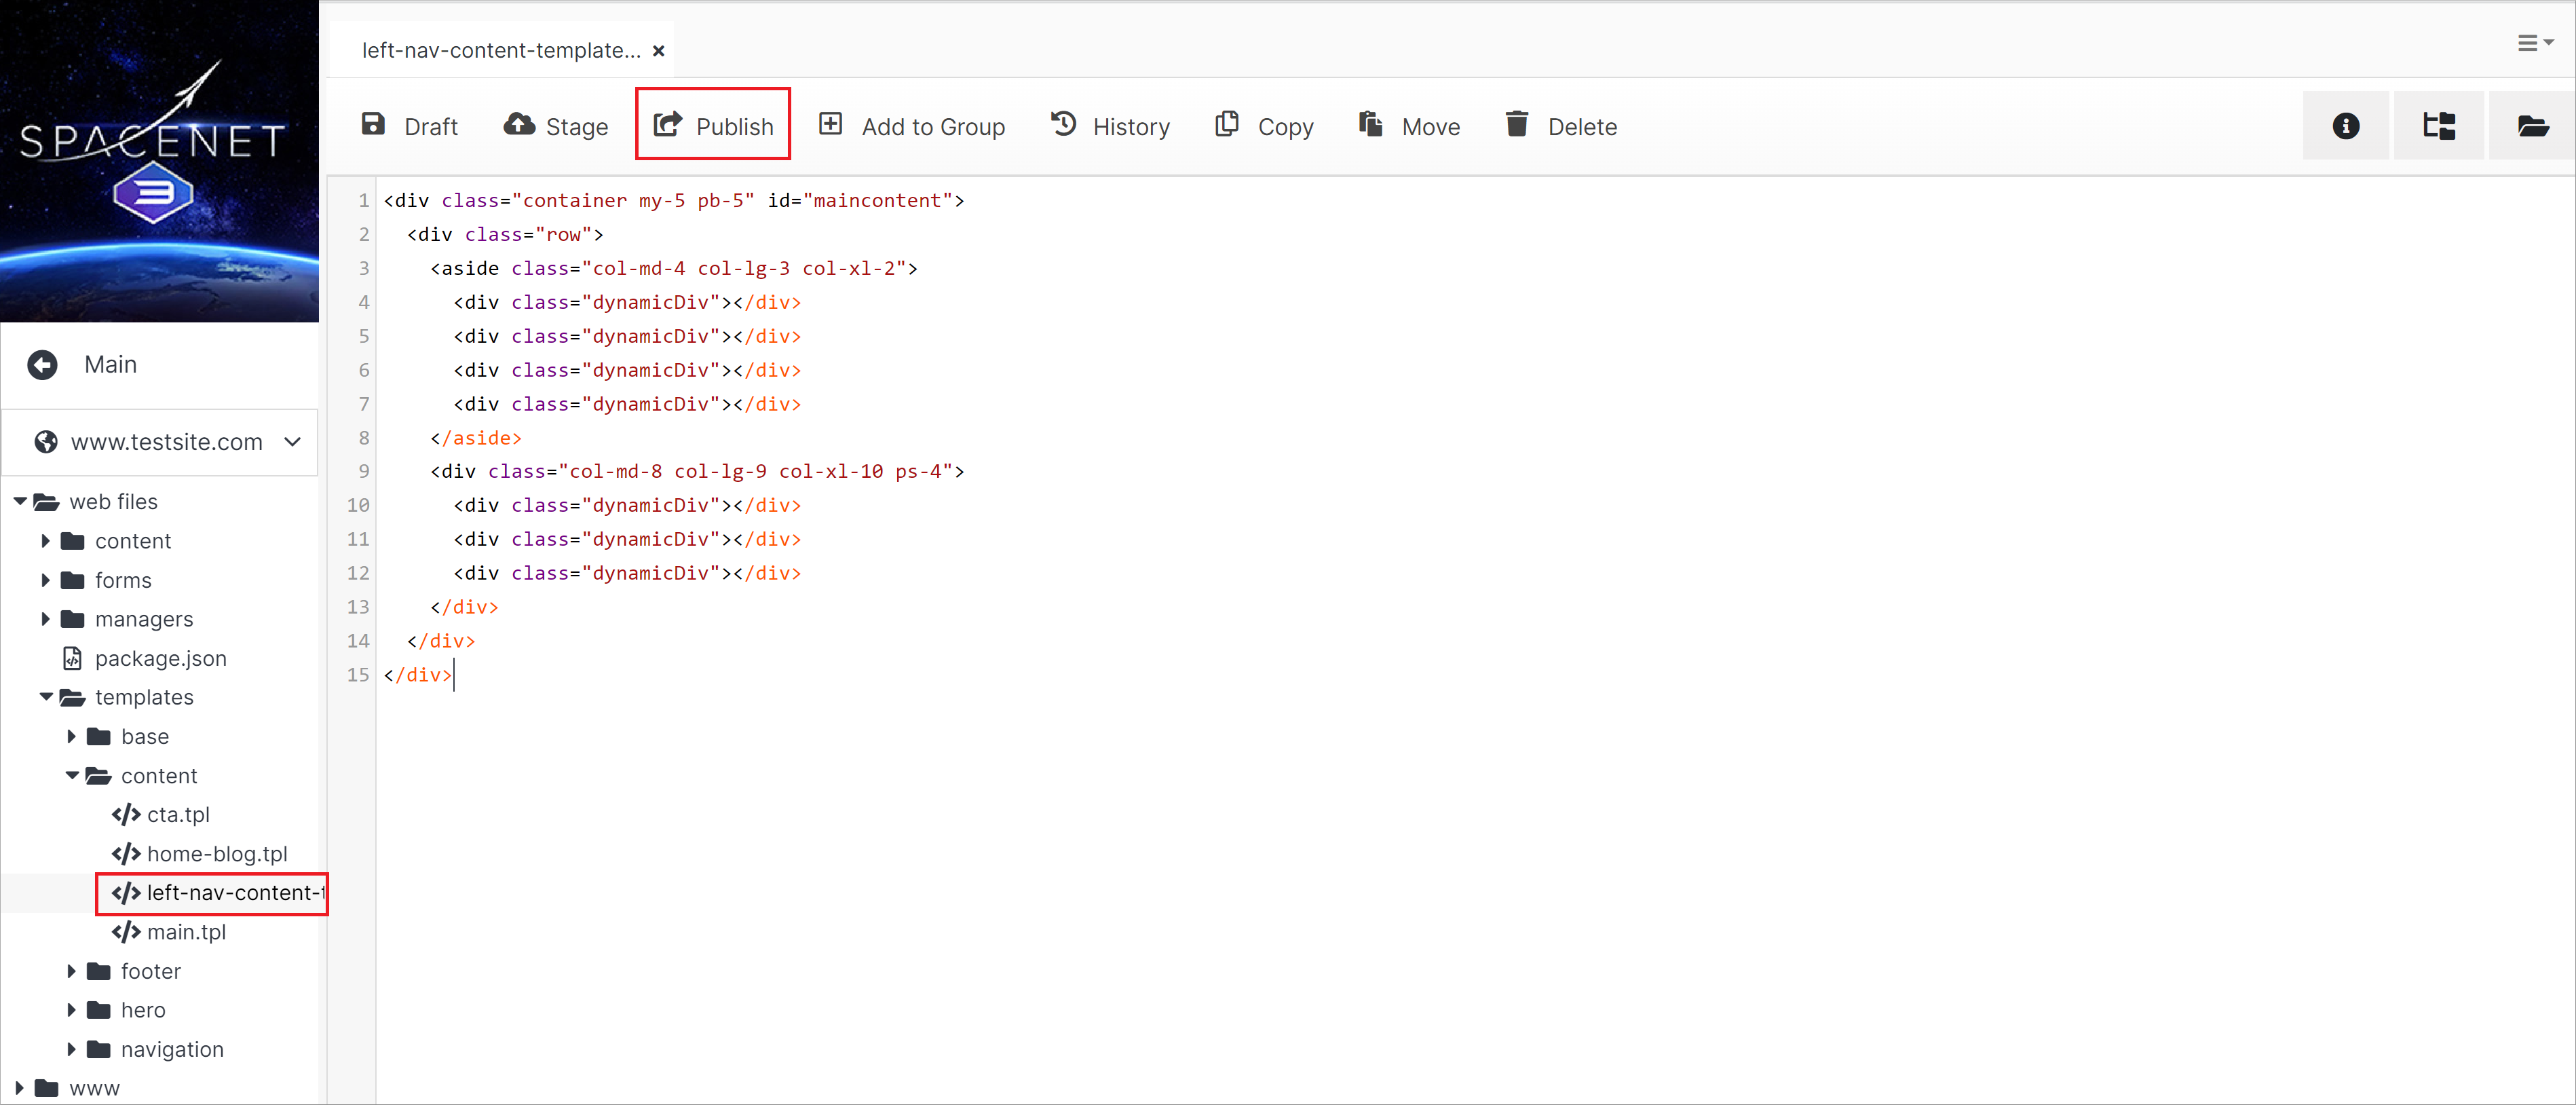
<div class="container my-5 pb-5" id="maincontent">
  <div class="row">
    <aside class="col-md-4 col-lg-3 col-xl-2">
      <div class="dynamicDiv"></div>
      <div class="dynamicDiv"></div>
      <div class="dynamicDiv"></div>
      <div class="dynamicDiv"></div>
    </aside>
    <div class="col-md-8 col-lg-9 col-xl-10 ps-4">
      <div class="dynamicDiv"></div>
      <div class="dynamicDiv"></div>
      <div class="dynamicDiv"></div>
    </div>
  </div>
</div>
Step 2: Under the www folder, click on the privacy.stml file.
Step 3: Next, under web files, open the templates folder and browse to the base folder.
Step 4: Just like in the case of homepage, click in the top dynamic div. Once activated, it will turn blue, indicating that it is ready to have a template applied to it.
Click on the base-template.tpl file.
Once complete, click Publish. After your page reloads, you will see the new layout of your privacy.stml file.
Note:
Solodev provides a rich visual editing experience. The editor renders a preview of your frontend website, but minor differences may occur due to the software’s features and functionality. This can affect the appearance of fonts and images within the editor. You can compare your progress to the live SpaceJet sample site.
Step 5: Repeat step 4, and add top-nav.tpl, and the footer.tpl in correct places. Once done, click Publish.
Step 6: Repeat step 4, and add left-nav-content-template.tpl, cta.tpl, and the footer.tpl in correct places. Once done, click Publish.
Step 7: Repeat step 4, and add the left-nav.tpl with the following code:
 [non_admin_only]
      [solodev_nav nav_type="side" nav_class="list-unstyled" include_categories="1"]
   [/non_admin_only]
Step 8: Repeat step 4, and add privacy.html containing your privacy statement, for example:
Here is my privacy policy.
#
How to save a page as a reusable template
Once you have completed your sectional and content pages, you can save them as reusable templates for use across your website. For the purposes of this lesson, you will use the SpaceJet sectional page that you completed in the previous section.
Note:
Saving your pages as templates allows for easier updates at a global level.
#
How to save a sectional page as a template
Step 1: Identify the elements that your pages have in common. For example, in the SpaceJet theme, the reusable elements would be the base template, the header, and the footer.
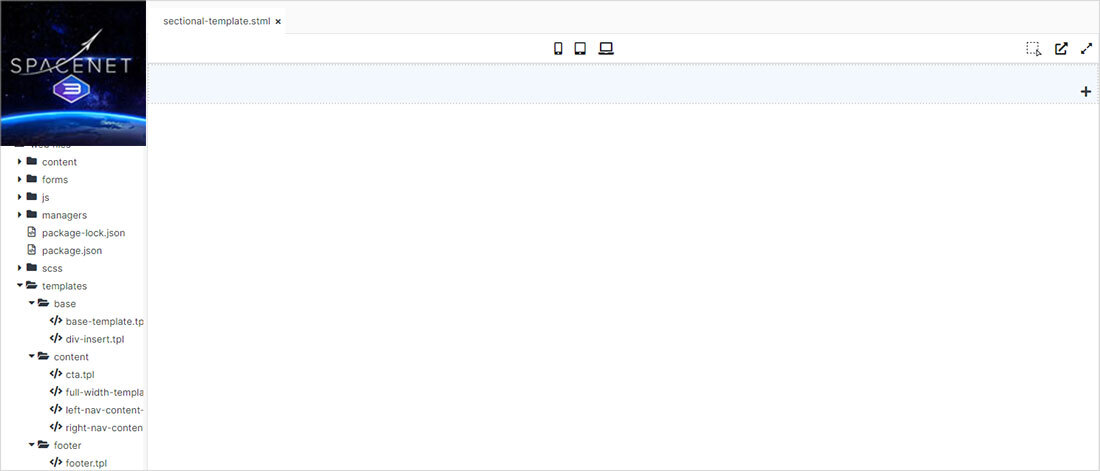
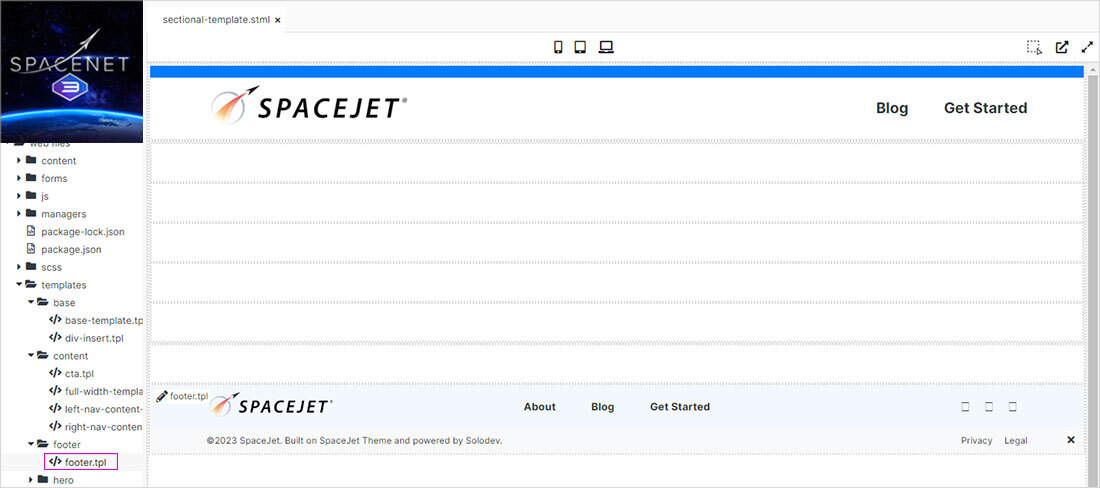
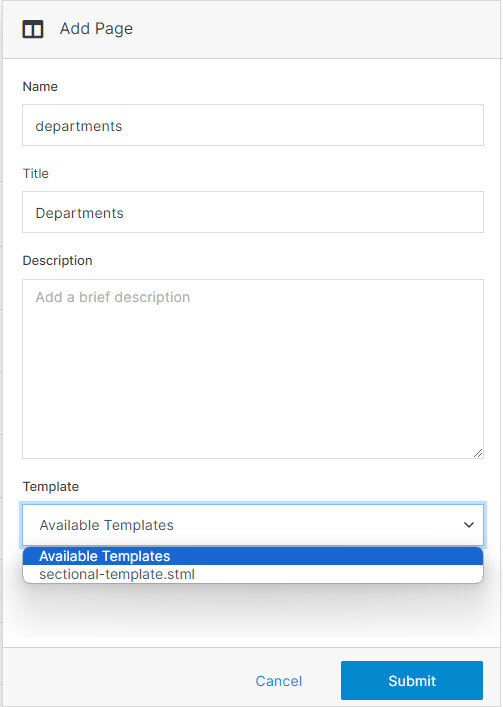
Step 2: Click on www folder and select Add Page from the right-hand menu. Name the page sectional-template.stml. Once complete, click Submit.

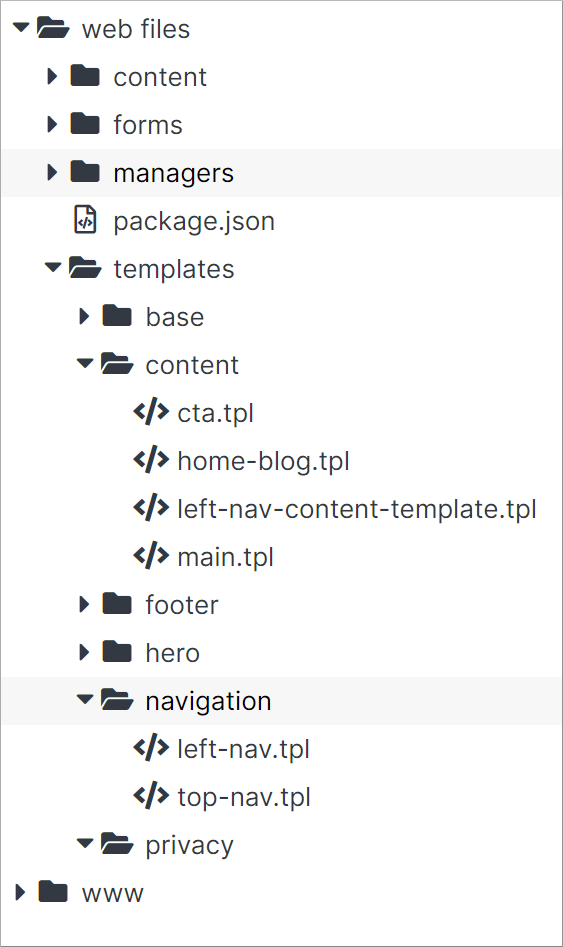
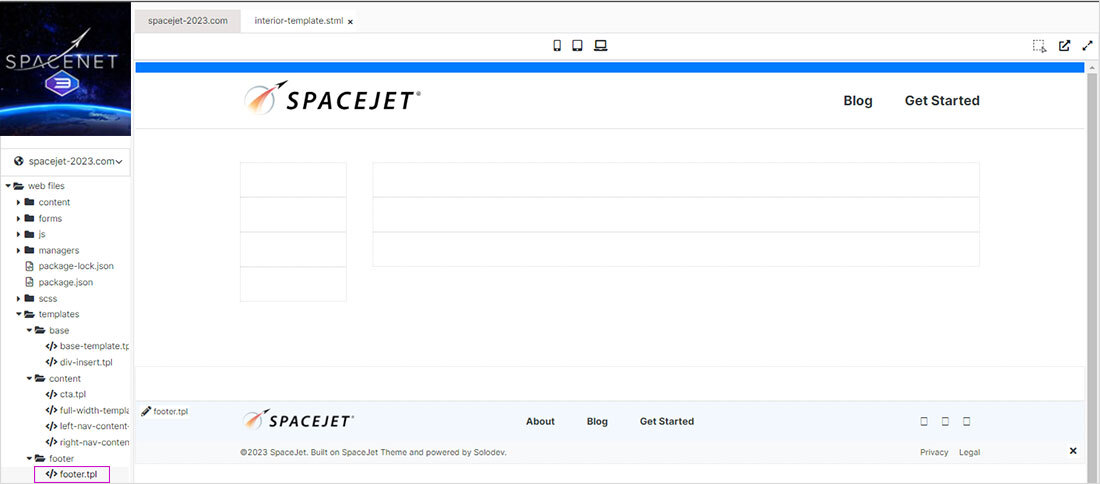
Step 3: Keeping the sectional-template.stml file open, browse to web files and open the templates folder, which includes the base, content, footer, and navigation folders.
Click on the dynamic div in the main canvas of your newly created sectional-template.stml page.
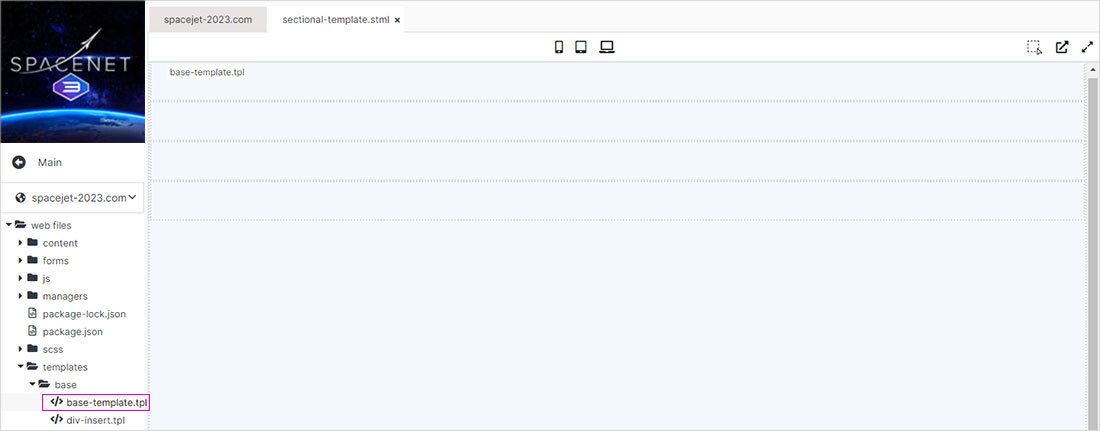
Step 4: The dynamic div will turn light blue, indicating that you can apply files to it. From the left-hand menu, click on the base-template.tpl file, so the dynamic div replaced by the base template. Once complete, click Publish in the top right corner.
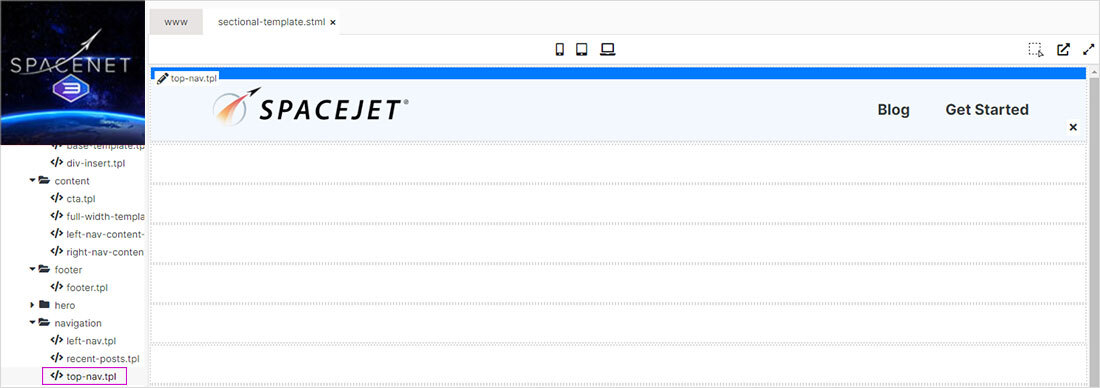
Step 5: On the page, select the top dynamic div, and click on the top-nav.tpl file from the left-hand menu.
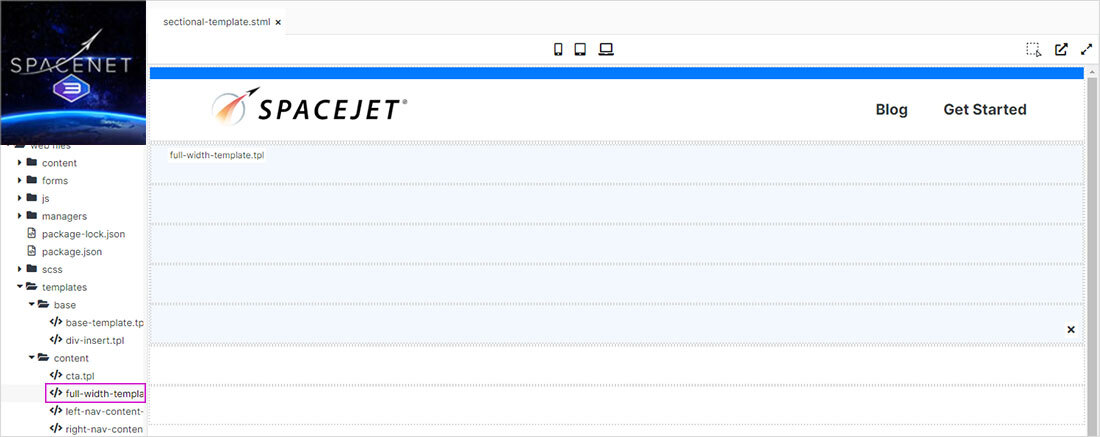
Step 6: Following the previous step, select the second dynamic div, and click on the full-width-template.tpl file from the left navigation. Once complete, click Publish.
Step 7: Finally, select the bottom dynamic div, and click on the footer.tpl file from the left-hand menu.
Step 8: Once you have all your elements assembled in your template page, you can save the page as a template.
To do this, use the page manager menu at the right and open the Advanced accordion.
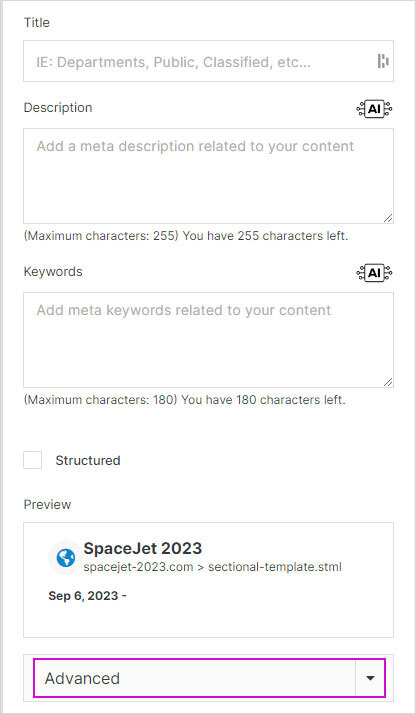
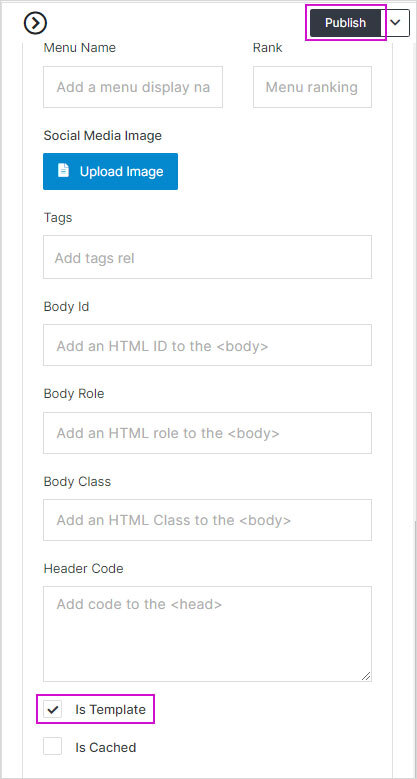
Step 9: At the bottom of the Advanced menu, click the “is Template” checkbox. Once complete, click Publish at the top of the page.
Note:
If you need to make any adjustments to the sectional template you just created, you can locate it under the www folder. Bear in mind that any new changes will not be applied to the pages you previously created using this template.
Step 10: To use your template, go to the location under www where you want to create your sectional page, and click Add Page on the right-hand menu.
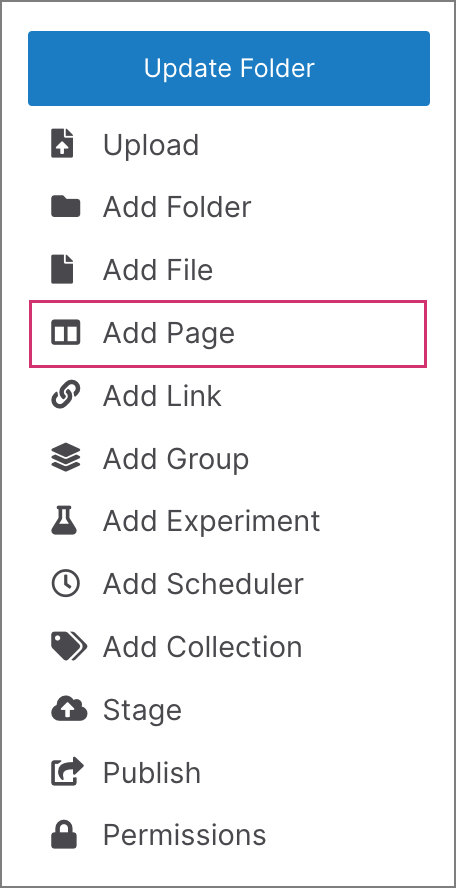
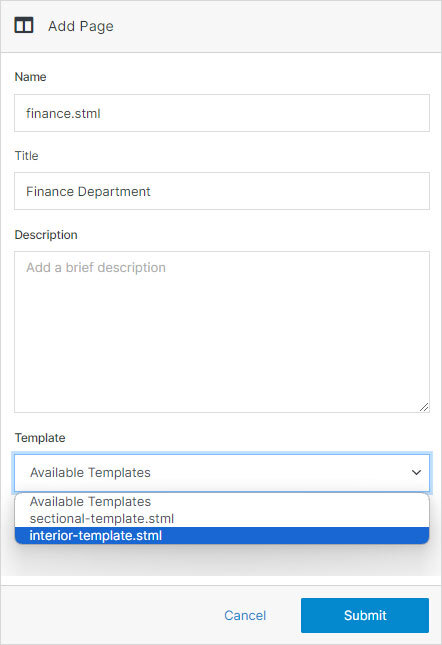
Step 11: On the Add Page modal, give your page a name and a title. You will also see a dropdown called Templates. To use an available template, click on the dropdown and select the sectional-template.stml you just created. Click Submit.
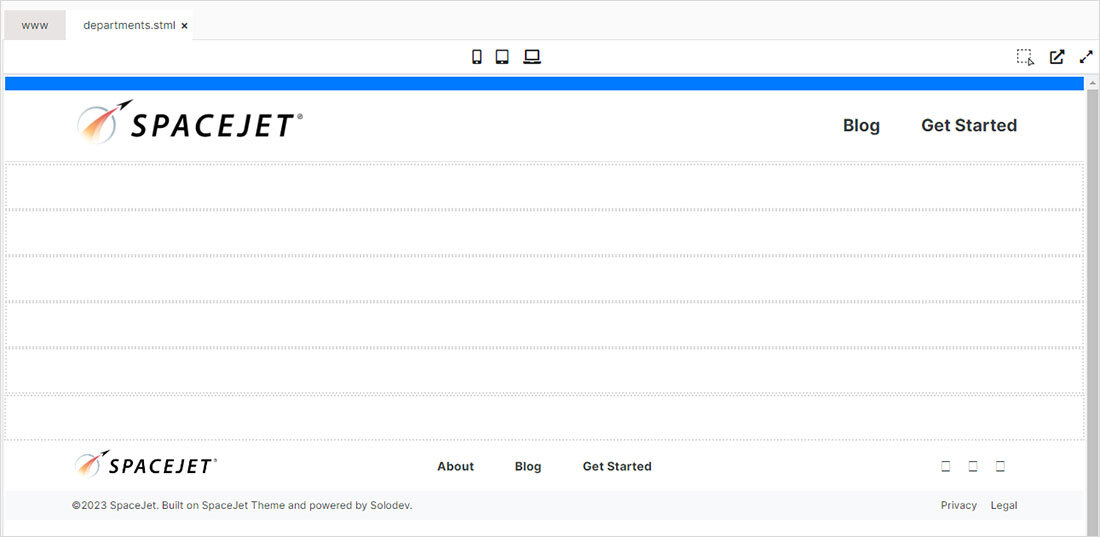
Step 12: Go to your new page and you will see it already contains the elements you added to the sectional-template.stml.
#
How to save a content page as a template
Step 1: Identify the elements that all pages have in common. Using SpaceJet theme as an example, the reusable elements would be the base template, the header, the footer, the content template, and the left navigation.
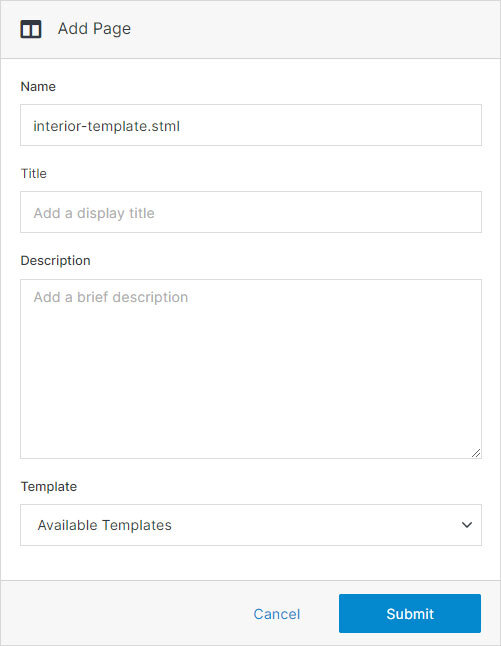
Step 2: Click on www and select Add Page from the right-side menu. Name the page interior-template.stml. Click Submit.
Step 3: Follow steps 3 to 5 from the "How to save a sectional page as a template" tutorial.

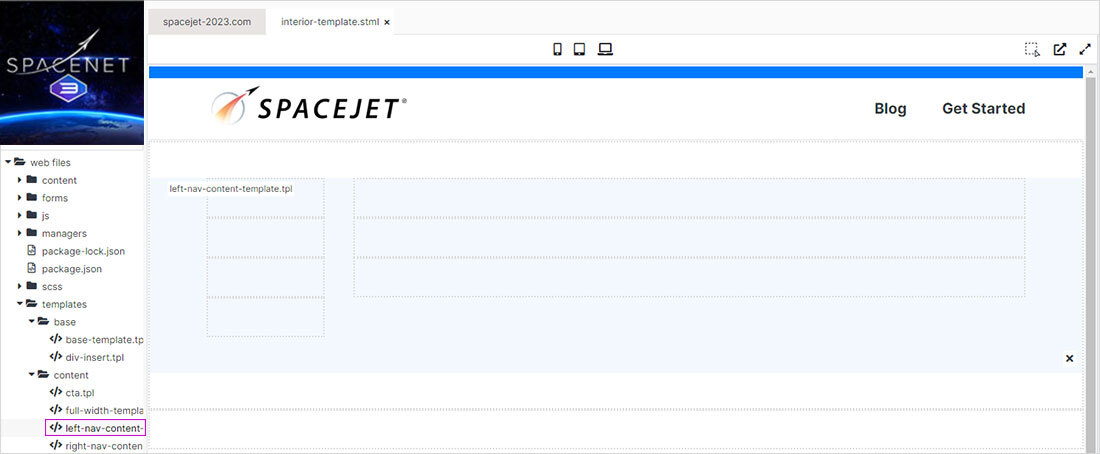
Step 4: Click on the second dynamic div and click on the left-nav-content-template.tpl file from the left navigation.
Step 5: Follow step 7 from the "How to save a sectional page as a template" tutorial to add a footer. Click Publish.
Step 6: Select the dynamic div corresponding to the left navigation section and click on the left-nav.tpl file from the left navigation. Click Publish.

Step 7: Once you have all the elements you want to have in the template page, we can add the page as a template. To do this, go to the bottom of the right-hand section of your page and click on the Advanced accordion.
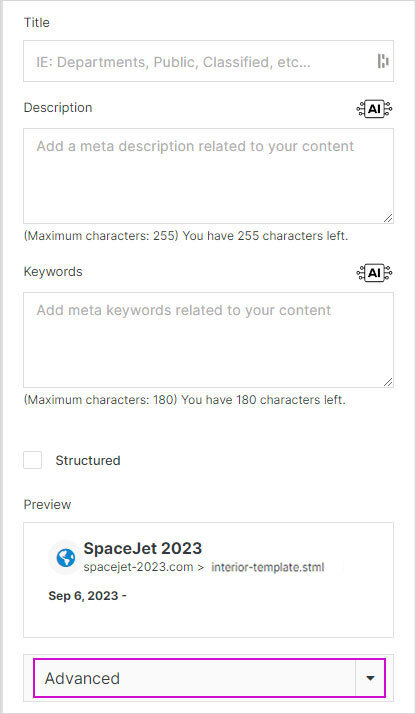
Step 8: At the bottom of the Advanced section, click on the “is Template” checkbox, then click Publish at the top of the page.
Note:
If you need to make any adjustments to the interior template you just created, you can locate it under the www folder. Just bear in mind that any new changes will not be applied to the pages you previously created using this template.
Step 9: To use your template, go to the location under www where you want to create your interior page, and click Add Page on the right-side navigation.
Step 10: On the Add Page modal, give your page a Name and a Title. You will also see a menu called Templates. To use an available template, click on the dropdown and select the interior-template.stml you just created. Once complete, click Submit.
Step 11: Go to your new page and you will see it already contains the elements you added to the sectional-template.stml.
