#
How to add a website to your CMS
The most basic yet important function in Solodev is adding a website to your CMS. In this article, you will learn how to create a fresh site from scratch, add the essential files and folders, and prepare your site for building pages.
Note:
Solodev is a native multi-site platform, allowing you to run multiple websites and apps with one license and manage it all from a single login. Each site is self-contained, but resources like files and images can be shared across sites.
#
Prerequisites
- You will need a valid URL such as www.testsite.com for your new site. If you do not currently own a URL, you can purchase one through a domain registrar such as GoDaddy.com.
- Once you have a URL, you need to point your domain’s DNS records to the server where your Solodev CMS is hosted on AWS. Visit your registrar’s website for instructions. To locate your server’s IP address in AWS, review step 6 of the Quickstart for Solodev CMS Professional Edition or Solodev CMS Enterprise Edition.
- Before getting started on any new website, it is highly recommended that you have an approved design prototype and sitemap to guide your development.
#
Adding a site
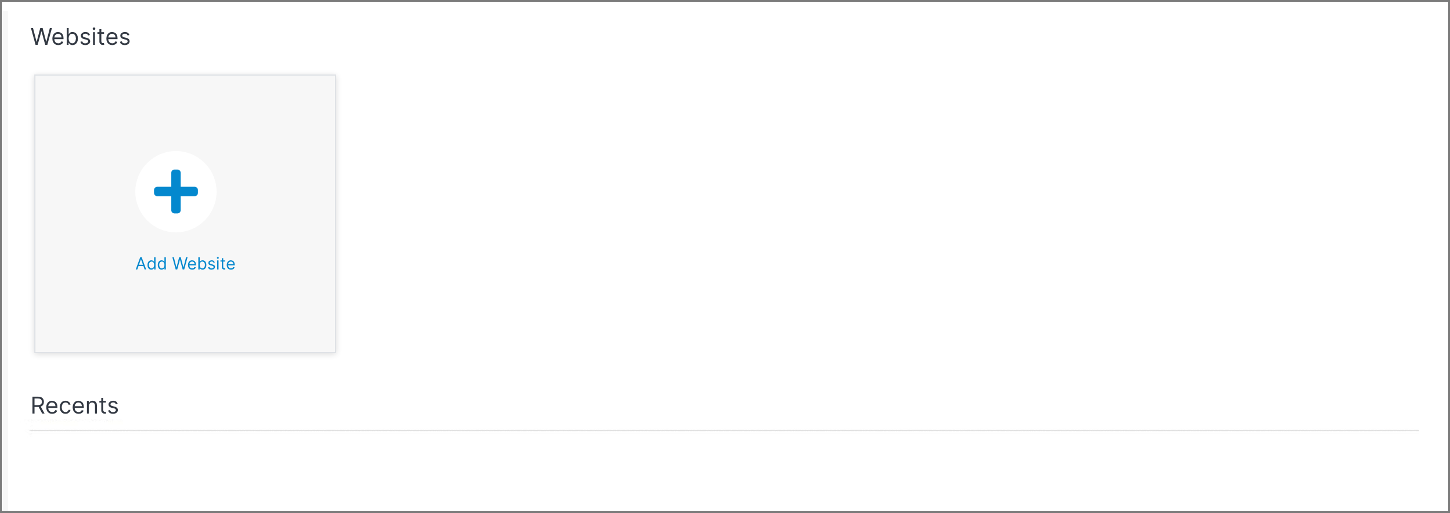
Step 1: Log into your Solodev CMS. On the main dashboard, click Add Website.
Note:
When adding a new site, you also have the option to upload a ready-made theme package, complete with all the necessary templates, folders, and files. To learn more, read how to import a theme.
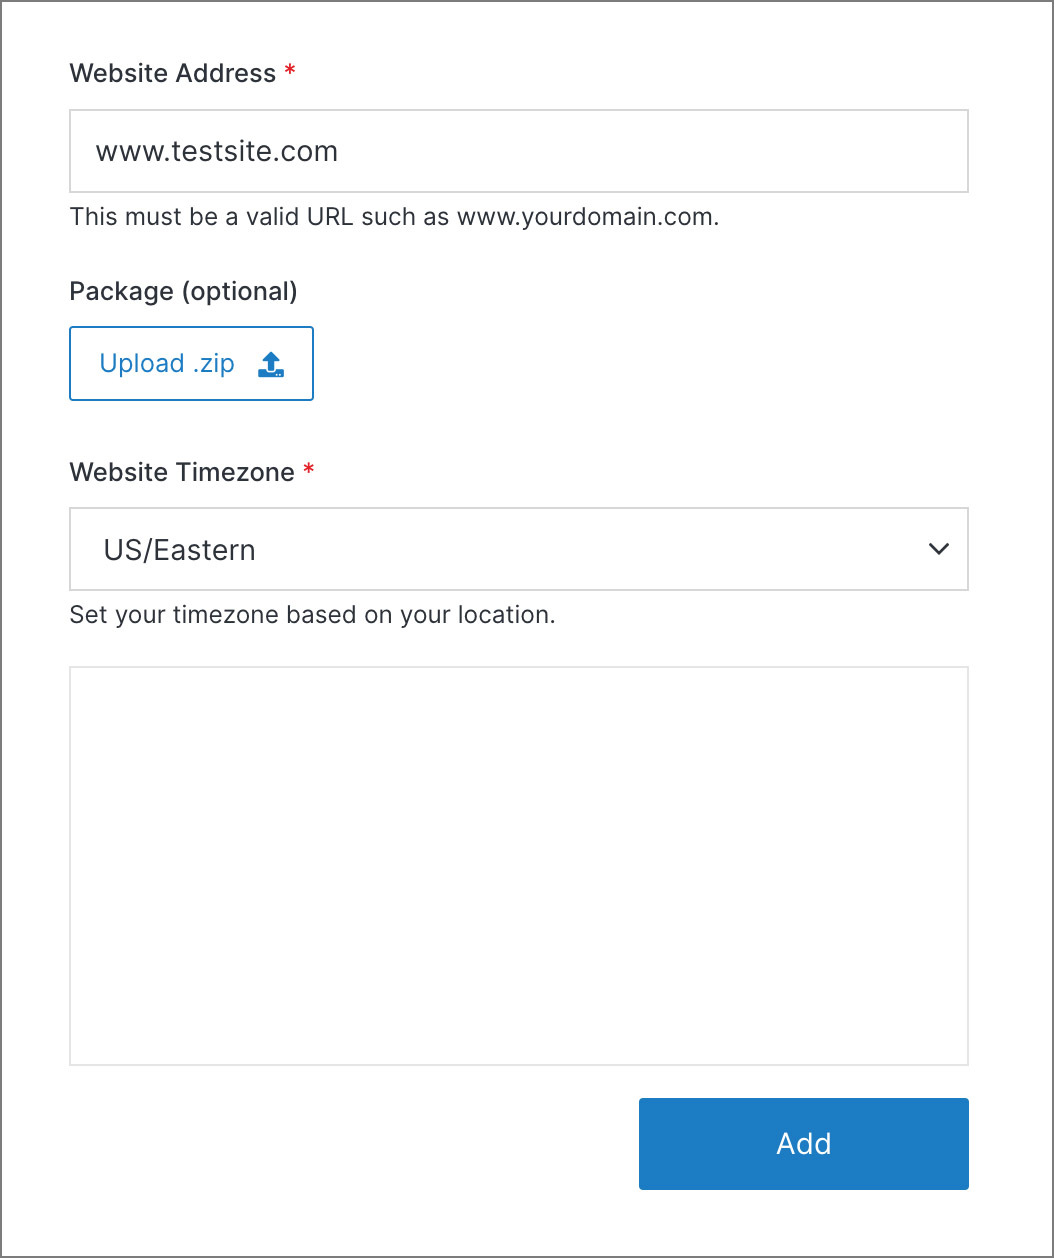
Step 2: In the form fields, enter your website address (a valid URL such as www.testsite.com) and select your timezone.
Step 3: Click Add.
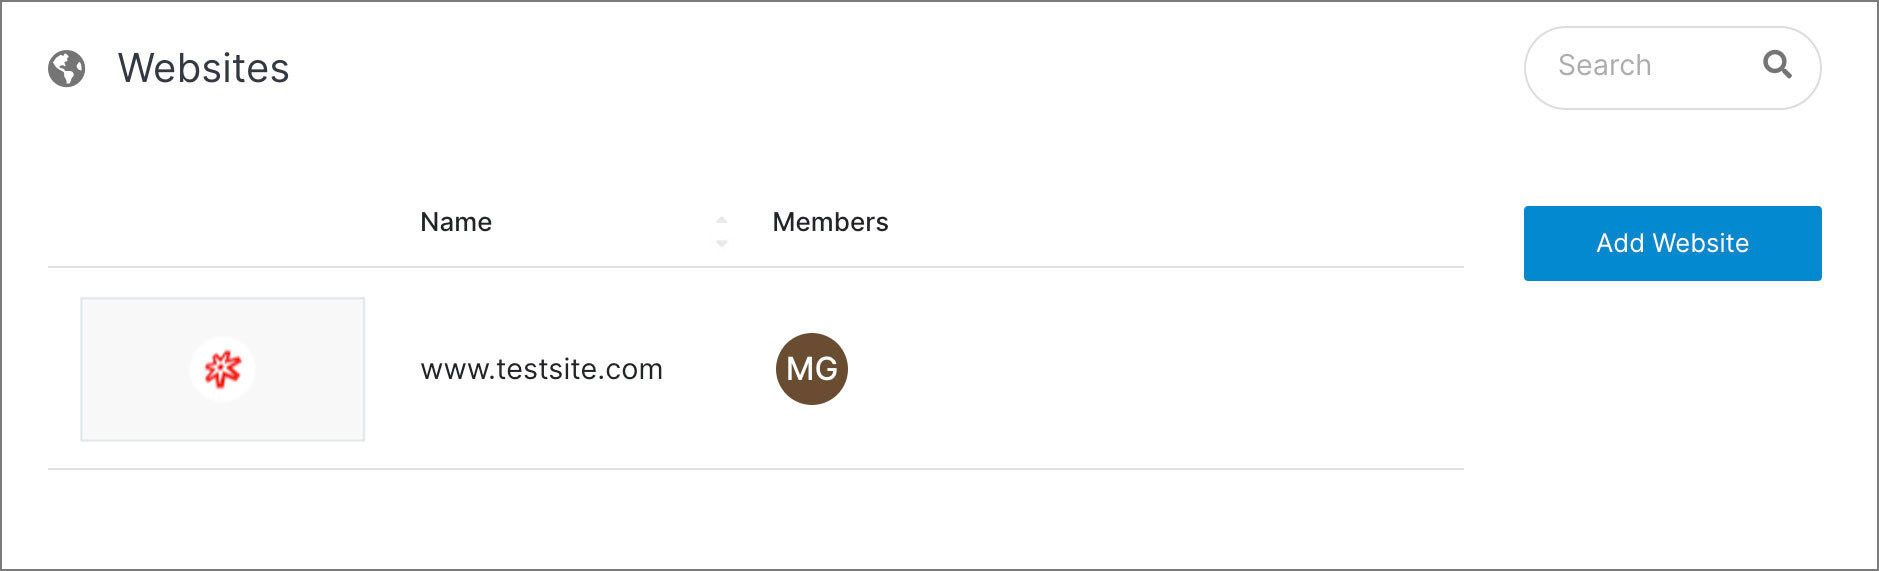
Step 4: Once your website is created, you will be automatically directed to the Websites dashboard in your CMS, where your new site will appear at the top of the table. Click on your site’s domain to access its dashboard.
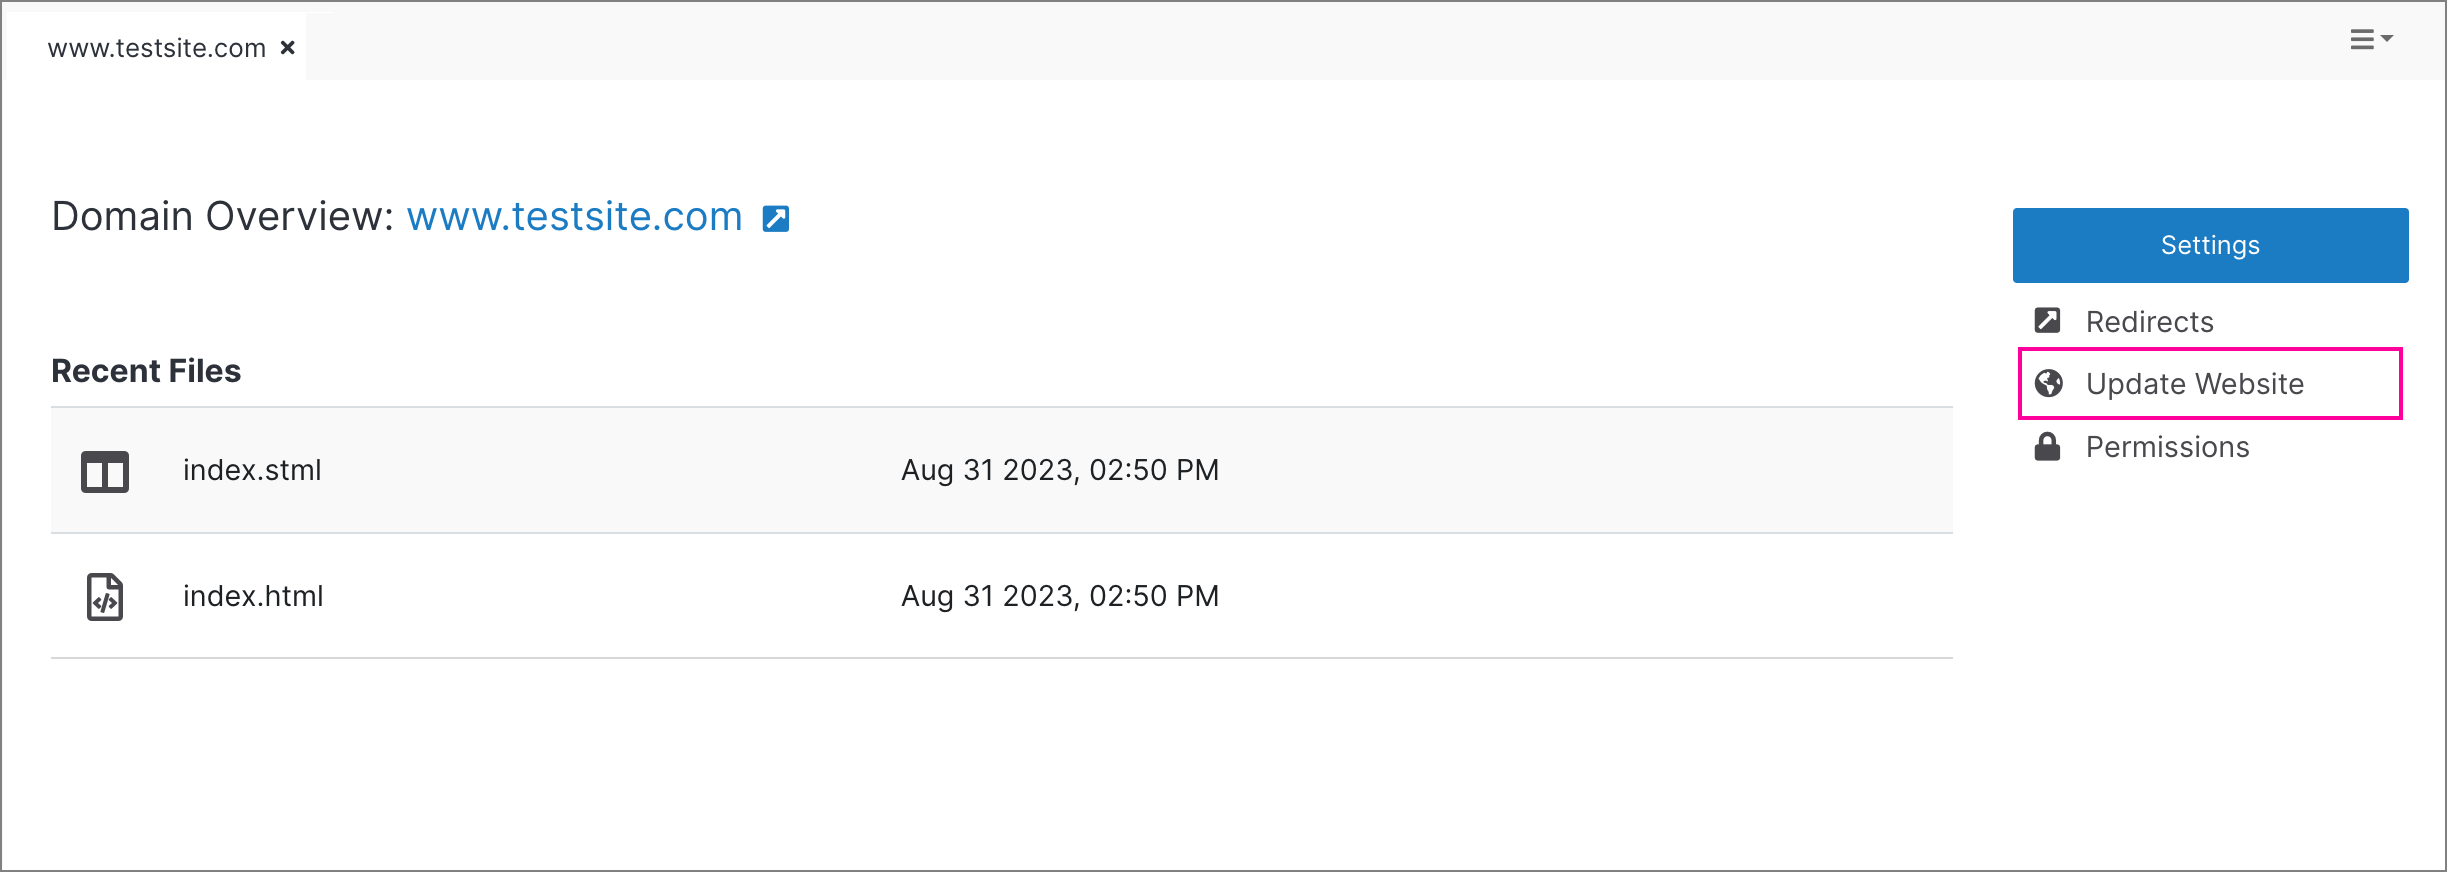
Step 5: On your new website’s dashboard, locate the two folders in the left menu called web files and www. The following sections will cover how to set up these folders so you can start building.

#
Updating your website information
After setting up the web files and www folders, you can add specific details about your social media and meta information to your website. You can also create custom pages such as a 404 or login page.
Note:
To learn more about updating your website information, read the Update Website article.
Step 1: From your website dashboard, click Update Website from the right-hand meu.
Step 2: In the Site Title field, give your website a name.
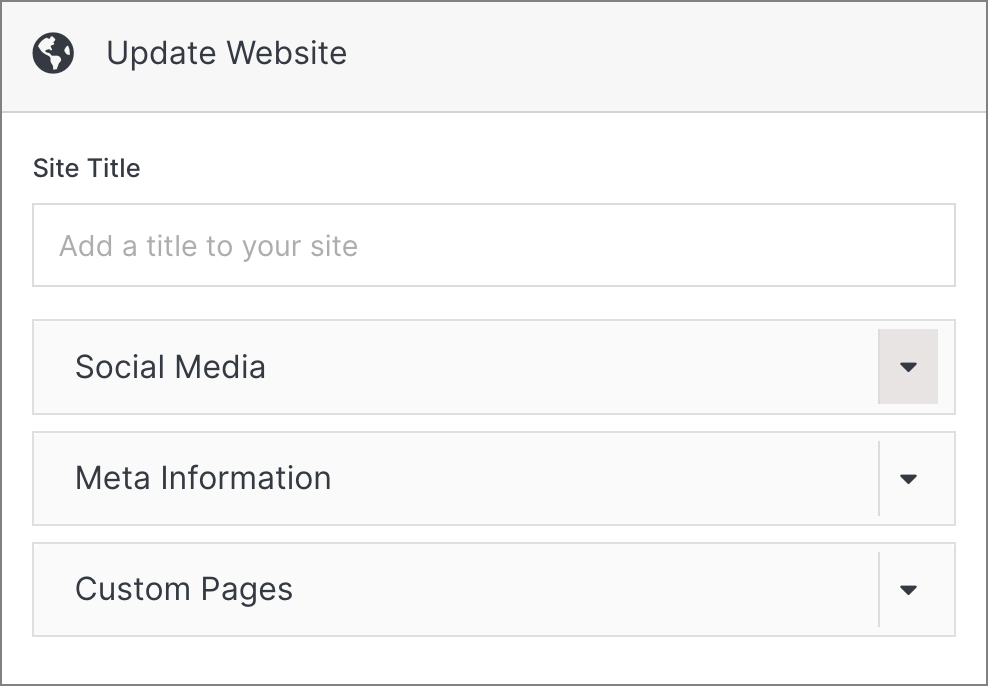
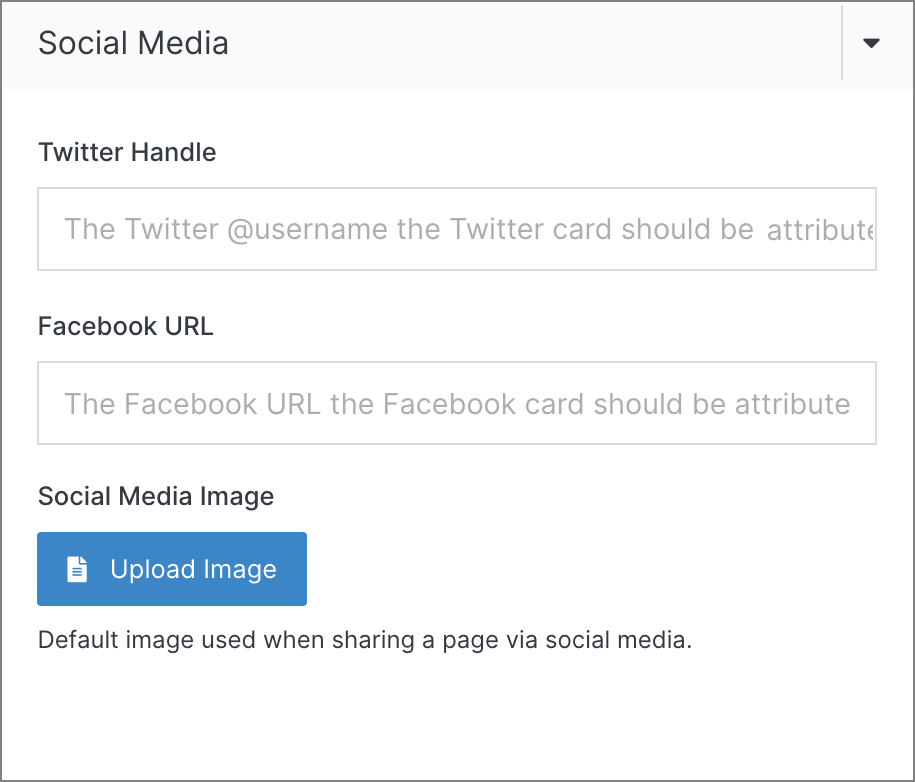
Step 3: Under the Social Media tab, add your Twitter (X) handle and Facebook URL. You can also add a default image that is used when sharing a page on a social media platform.
Step 4: Under Meta Information, find the two fields called Global HTML Tag and Global Header Insert. These HTML tags are used to provide additional information about a page to search engines and other crawlers.
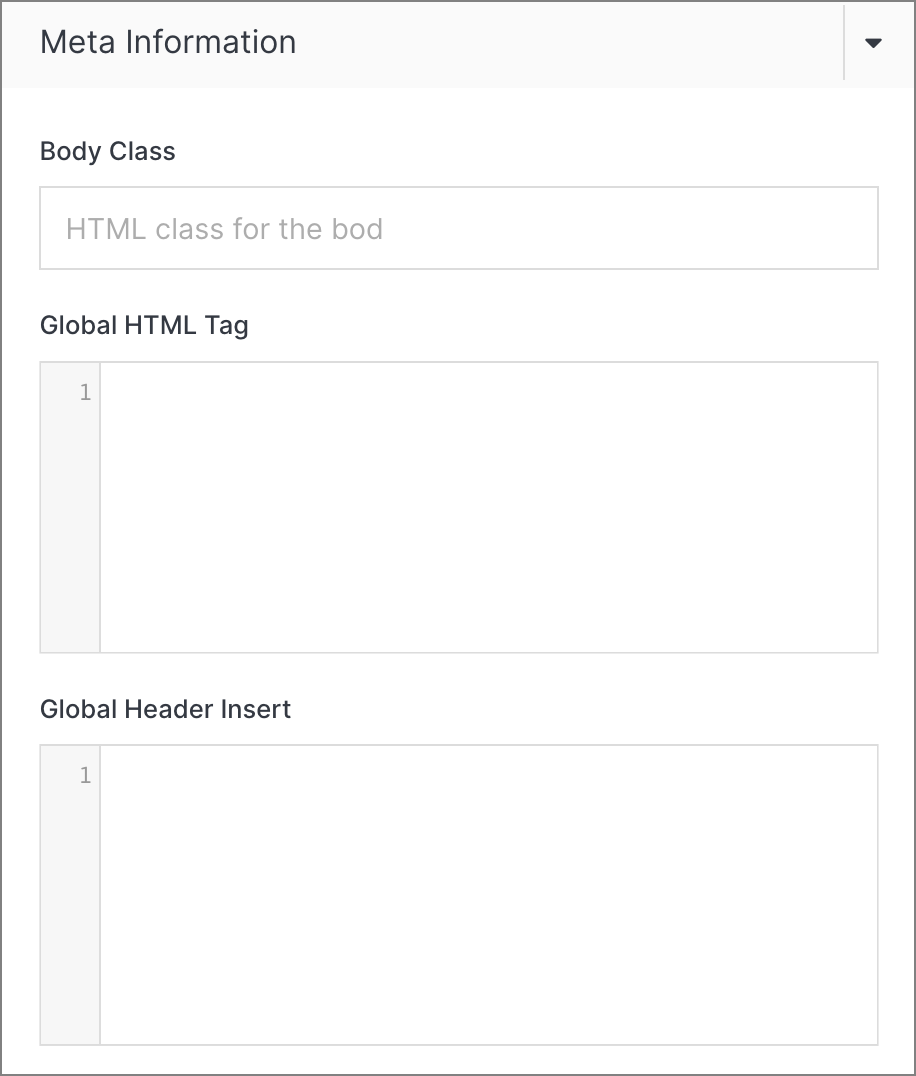
Step 5: In the Global HTML Tag field, add the HTML doctype declaration below:
<!DOCTYPE html>
<!--[if lt IE 7]> <html class=“no-js lt-ie9 lt-ie8 lt-ie7” lang=“en”> <![endif]--
>
<!--[if IE 7]>    <html class=“no-js lt-ie9 lt-ie8” lang=“en”> <![endif]-->
<!--[if IE 8]>    <html class=“no-js lt-ie9” lang=“en”> <![endif]-->
<!--[if gt IE 8]><!-->
<html class=“no-js” lang=“en”>
<!--<![endif]-->
Step 6: In the Global Header field, add the sample code below, which includes your meta tags, tracking codes, and the link to your compiled css and js files.
<meta http-equiv="X-UA-Compatible" content="IE=edge">
<meta name="viewport" content="width=device-width, initial-scale=1, maximum-scale=2.0">
<meta name="format-detection" content="telephone=no">
<meta content="" property="og:image">
<meta property="og:image:type" content="image/jpg">
<meta property="og:image:width" content="500">
<meta property="og:image:height" content="auto">
<meta name="twitter:image" content="">
<link rel="shortcut icon" href="/favicon.ico">
<link href="https://cdn.jsdelivr.net/npm/bootstrap@5.3.1/dist/css/bootstrap.min.css" rel="stylesheet" integrity="sha384-4bw+/aepP/YC94hEpVNVgiZdgIC5+VKNBQNGCHeKRQN+PtmoHDEXuppvnDJzQIu9" crossorigin="anonymous">
<link href="https://cdnjs.cloudflare.com/ajax/libs/font-awesome/6.4.2/css/all.min.css" rel="stylesheet">
<!-- HTML5 shim and Respond.js for IE8 supp
ort of HTML5 elements and media queries -->
<!--[if lt IE 9]>
<script src="https://oss.maxcdn.com/html5shiv/3.7.2/html5shiv.min.js"></script>
<script src="https://oss.maxcdn.com/respond/1.4.2/respond.min.js"></script>
<![endif]-->
<script src="https://cdn.jsdelivr.net/npm/bootstrap@5.3.1/dist/js/bootstrap.bundle.min.js" integrity="sha384-HwwvtgBNo3bZJJLYd8oVXjrBZt8cqVSpeBNS5n7C8IVInixGAoxmnlMuBnhbgrkm" crossorigin="anonymous"></script>
<script src="https://cdnjs.cloudflare.com/ajax/libs/font-awesome/6.4.2/js/all.min.js"></script>
Step 7: Once you have completed updating your website information, click Submit.
#
Setting up your web files
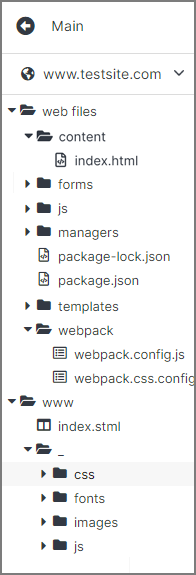
When creating a new website, a web files folder is automatically generated.
The folder contains four sub-folders:
- content
- forms
- managers
- templates
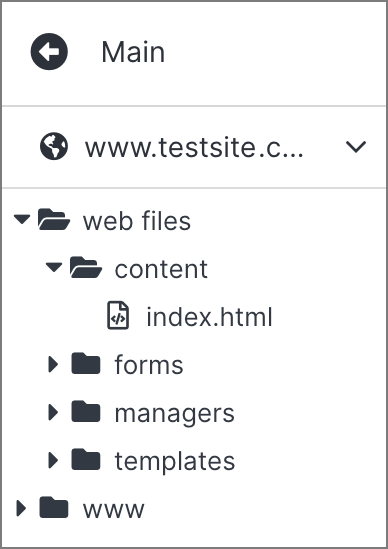
The content folder also includes a single file called index.html, which corresponds to the index.stml file in the www folder. An index file is what a browser reads first under your website domain, which is why it is referred to as your website’s homepage.
In the next lesson, you will learn about the additional files and folders that are required in your web files and how to create them.
Note:
For more details on the Website Dashboard and the web files and www folders, read the Website Overview article.
Step 1: Click on the web files folder in your menu. Using the menu on the right, click Add File.
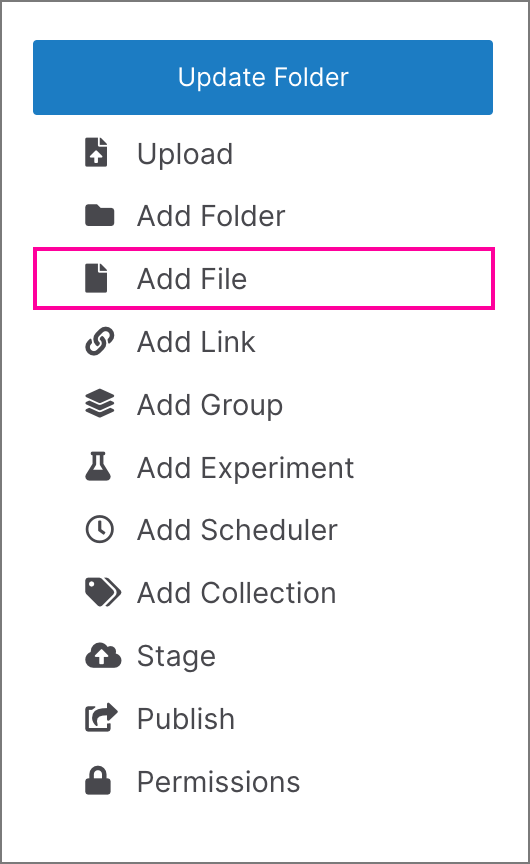
Note:
For more details on how to add a file or folder to your CMS, read the Add File article.
Step 2: In the menu, create a file called package.json and select Code from the dropdown. You can add an optional title, but it is not required. Once complete, click Submit.
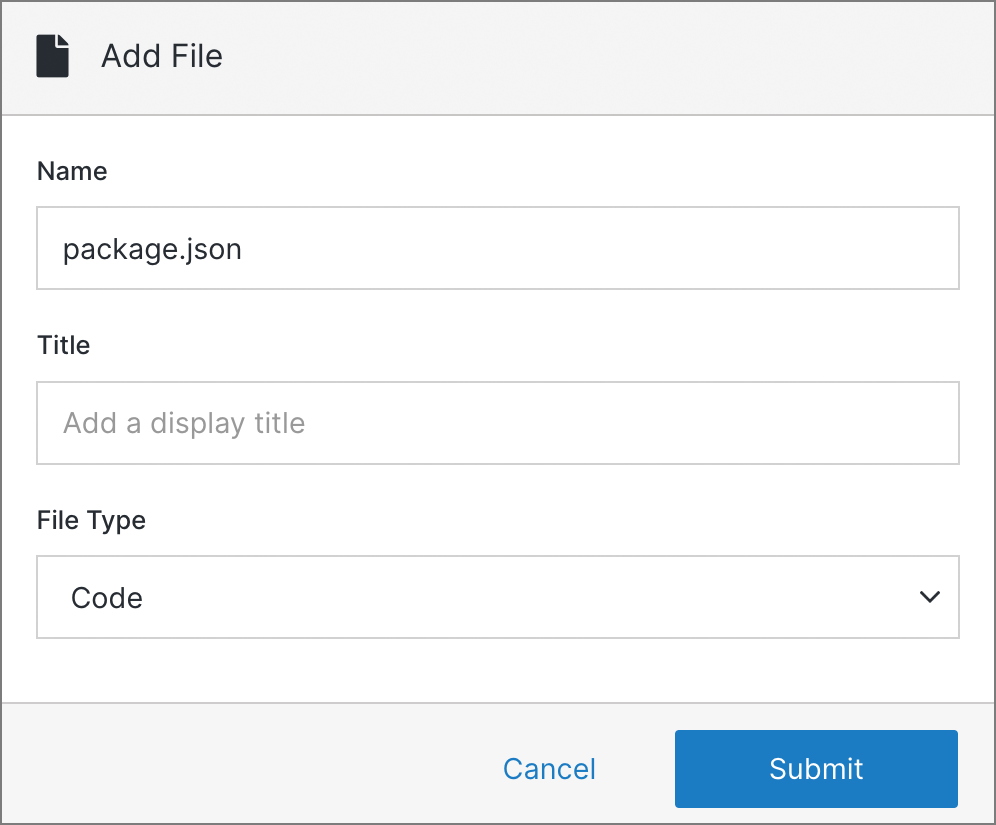
Note:
A package.json file is used to identify and understand how to handle your website’s dependencies. It is composed of functional metadata about your project, such as its name and version.
Step 3: Once your package.json file is created, click on it to open the code editor.

Step 4: Download the sample json code below, add it to your file and click Publish.
Step 5: Using the same process in steps 1 and 2, create another file called package-lock.json
Note:
A package-lock.json is used to store the exact versions of the dependencies that you have installed.
Step 6: Once your package-lock.json file is created, follow steps 3 and 4. In the editor, add the code sample that you can download here, then click Publish.
#
Setting up your www folder
When creating a new website, a www folder is automatically generated. The folder contains only one file called index.stml, which corresponds to the index.html file under the content folder of your web files.
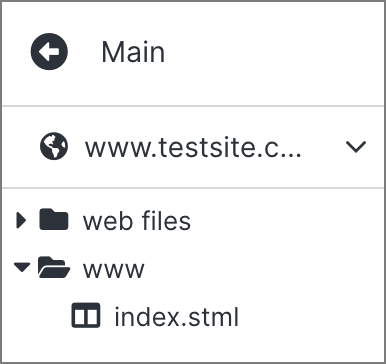
An index file is what a browser reads first under your website domain, which is why it is referred to as your website’s homepage.
In the next lesson, you will learn about the additional files and folders that are required for your www folder and how to create them.
Note:
For more details on the Website Dashboard and the web files and www folders, read the Website Overview article.
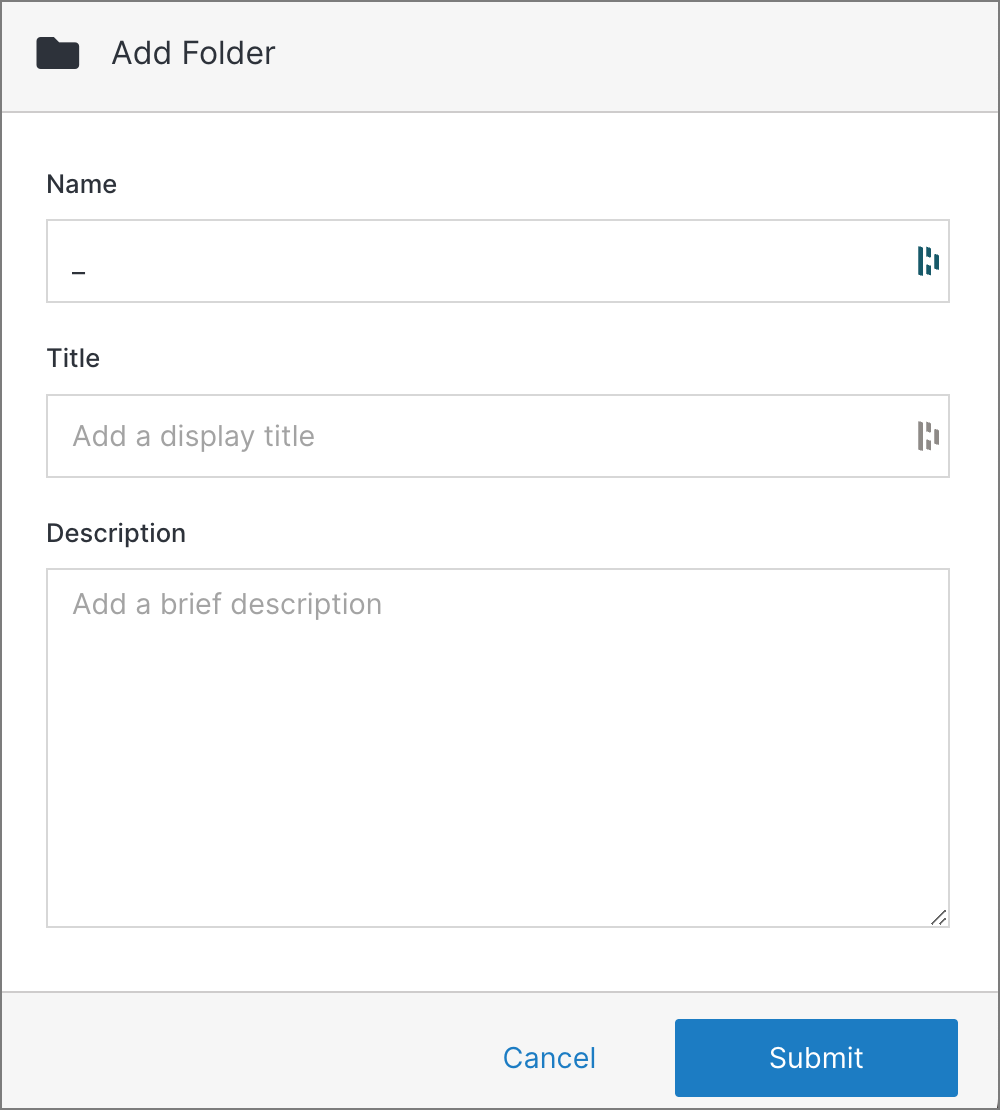
Step 1: Click on the www folder in your menu. Using the menu on the right, click Add Folder.
Step 2: In the menu, create a folder called "_" (the underscore character). You can add an optional title and description, but it is not required. Once complete, click Submit.
Step 3: Following steps 1 and 2, create four additional folders under the "_" folder:
- css
- images
- js
Note:
The _ folder is a general repository for your website’s resources:
- CSS is the compiled version of the cascading style sheets that govern your website.
- Images will host all the graphics, photos, and visual assets.
- js will contain the compiled JavaScript used on your website.
Step 4: Click on the css folder and Add a File called app.css select Code from the dropdown. Once complete, click Submit.
Step 5: Click on the js folder and Add a File called app.js select Code from the dropdown. Once complete, click Submit.
Once your web files and www have been set up, it should contain the following files and folders:
#
Next Steps
- In the next tutorial, you will learn how to Add a page, save page as a templates, and create content on your new website.
- For more advanced sites with custom styling, read the How to add SCSS to your website tutorial.